Today, paintings or art created using a computer are no less interesting than ordinary canvases written on paper. Controlling the mouse cursor is no easier than moving a pencil or brush across the canvas. Some artists who are professionally involved in the electronic art of drawing resort to the help of special devices such as graphics tablets, which eliminates the need for a mouse, but in this case special software is required.
Let's consider best programs for creating art on a personal computer for both amateur and professional environments. Let us outline the key capabilities of the software, ease of use and accessibility of products for different users. We won’t mention the venerable “Photoshop”, because literally all PC artists already know about its existence and its widespread dominance in our computers, but we’ll look at lesser-known and smart drawing utilities.
Paint.NET
This is a basic art creation program that is included in almost every copy of the Windows platform. She has at her disposal everything necessary for initial drawing tools: brush, pencil, eraser and fill. Moreover, each instrument has a dozen varieties: thickness, saturation, handicap, etc.

For connoisseurs of virtual art in the style of abstractionism and cubism, the art creation program includes triangle, rectangle, stretching ellipse, polyhedra and conversation clouds for comics. There are also no problems with support for graphic formats. On the official Microsoft resource and on amateur sites you can find some additional plugins and add-ons that significantly expand the capabilities of the program for creating art, turning it into a real monster of art.
We can recommend the utility to any novice artist, as they say, for testing the pen. You can’t count on creating any serious paintings using this program, but it’s quite possible to get your hands on it.
The GIMP
This is a fairly powerful program for creating pixel art, and in its functionality it is as close as possible to the legendary Photoshop. The utility's capabilities allow you not only to draw a picture from scratch, but also to apply many effects to ready-made images. In addition, the program’s functionality easily copes with the initial layout of websites or some other design layouts.
The program for GIMP supports multi-layer work with images, detailed customization of tools, the most accurate color calibration, etc. The utility also supports professional graphics tablets, so it can be recommended to both experienced artists and novice amateurs.
Inkscape
Another well-developed program for creating pop art and complex drawing. The utility allows you to perform any operations with contours, edit the gradient, change the style and type of nodes. In general, the software provides almost everything to draw professional masterpieces of art.

In addition, in the settings you can find large number preset shapes that can be changed as you wish. The program supports convenient hotkeys and export not only to all popular graphic formats, but also specific ones, such as XML. Professional painters have plenty of room to explore in Inkscape, but amateurs will find it difficult to understand all the nuances and specifics of the utility, so it’s better for them to choose something simpler or study the manual thoroughly.
SmoothDraw
This great program to create art from photos. The utility has been adopted by tens of thousands of users, including professional artists, and amateur beginners. There is no need, as in previous programs, to thoroughly study the menu and available tools - just open a new file and give free rein to your imagination using intuitive and well-visualized functionality.
At your disposal are multi-layered objects, canvas rotation along all axes, blending modes and sub-pixel anti-aliasing levels. In addition to the standard set of tools for painting on ready-made photos or from a blank sheet of paper, the utility includes rare ready-made brushes like graffiti, stars, grass or water drops. The program also fully supports graphics tablets, which is a clear plus for such software.
PixBuilder Studio
Another program for editing and creating pixel art, that is, raster graphics. The software's capabilities also allow you to easily work on website design, which is why the utility is enviably popular among webmasters, competing with the famous Photoshop.

In addition to the already familiar basic set of tools, there is work with layers, multi-stage undoing of operations, adjusting curve lines and levels, as well as adjusting the popular Bloom (blur) and sharpening effects. The user also has the opportunity to customize the interface at his own discretion: pin tools, display important options as separate elements, etc. Working with the program is quite comfortable for both professionals and amateur beginners.
Manga Studio
This special program for creating anime art. The user has access to a chic set of tools for drawing manga and comics. Those who have thoroughly studied the manual and have a good understanding of the menu branches as well as hot keys consider the utility the most convenient for sculpting anime.

All the tools, which are customizable, are always at your fingertips: screentone, coloring, black outline, brightener, etc. If you are unfamiliar with software of this kind, but really want to draw anime, then an extended version of the program with step by step instructions your choice - illustrations or videos, where in more detail all the nuances of this event are explained - from the basics to the creation of professional manga paintings.
Livebrush
This utility can be called a shining example of what a high-quality drawing book for children should look like. Despite its specificity, the program enjoys enviable popularity among established artists.
One of distinctive features of this software is vector patterns, where the user can apply a drawing of specified shapes and sizes. Here you can easily decorate with Slavic or oriental ornaments, some symmetrical grids or Gothic patterns. The already huge selection of brushes can be expanded with your own settings, or you can download an even larger assortment both from the developer’s official resource and from other amateur resources.
The software showed itself perfectly in working with graphics tablets and fully supports all stylus protocols. Moreover, the program monitors not only the pressure applied to the pen, but also its tilt, which for many artists is a critical point when choosing such utilities.
PaintTool SAI
This utility, along with Manga Studio, has become popular among fans of Japanese comics. In addition, many users called it a program for creating art on Minecraft because of its specific and convenient tools for this task. The utility is also perfect for those who like to draw landscapes and portraits in the style of hyperrealism or pop art.

The user has access to a wide range of tools: ballpoint pens, ink, dozens of brushes, pencils of different softnesses, pastels, watercolors, etc. Moreover, each individual tool can be customized to suit your specific needs. There is also the possibility of parallel work with several canvases and support for multi-layering of objects. This software is used by both professional artists and novice amateurs, and as mentioned above, it is an almost ideal program for creating art for Minecraft.
Affinity Designer
This is a good software for creating art with a classic design and a familiar set of tools. Here you will find a large assortment of brushes, gradients and other auxiliary modes. Among other mass of similar utilities, this program stands out because it copes perfectly with vector objects and can easily handle raster images. Many people use this software not so much for drawing from scratch, but for retouching photos and further processing them into a work of art.

One of the obvious disadvantages of the program is the lack of support for third-party plugins. All that is available to the user is a small list of add-ons on the developer’s official resource. The latter, by the way, promised to correct this defect in the very near future. But even without additional plugins, the utility is capable of a lot and will delight you with intuitive functionality with good artistic capabilities.
To sum it up
Drawing is a specific matter. Some people like to sculpt landscapes, some prefer to paint faces, and for others, don’t feed them bread - let them turn all of reality into Japanese manga. Despite the similarity of all the above products and functionality, each utility has some distinctive features.
Before you start creating the next masterpiece that your friends will admire, be sure to take into account the focus and set of tools of a particular art program. It’s better to spend a couple of hours studying the manual of the software you like than to then port your work to another utility with loss of data due to the lack of some kind of brush.


Good day everyone!
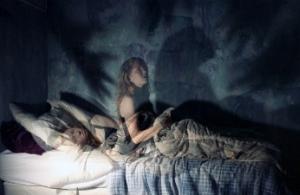
Probably almost every user has seen “strange” photographs of people online, as if it were a picture drawn by an artist. This picture has a name - art (example on the left with Nikulin). And, by the way, you can do it quite quickly using special online services.
I think the article will also be useful to all those users who want to make an unusual avatar for themselves. social networks(VK, Odnoklassniki, etc.), various forums, applications (for example, Skype, Viber, etc.), and simply surprise your friends and relatives.
And so, let's get down to business - creating art.
Note: to make art, you can use various graphic editors (for example, Photoshop). In this article I will not dwell on classic editors (because as long as you install the editor, configure it, and understand how to do it, using the service on the Internet you will already make dozens of different cool pictures ☺) ...
Choosing a service with the best photo effects
Pho.to
One of the best Russian-language online services for adding various effects to photos. For example, a color photograph can be redone:
- V black and white drawing as if it was painted: with a brush, pencil, etc.;
- in color drawing: there can also be a variety of options;
- in a cool and funny picture. For example, your photo will be placed in a frame that is drawn by a child, an artist, etc. (examples of options are shown below).

Using the service is extremely simple:
- First choose the effect you like;
- upload your photo;
- and after a few seconds - look at your cool art. An example is shown below: Isn’t it really well drawn?!

How the photo has changed: it was - it became (from left to right)
Photomania.net
Another extremely interesting site, which is an online photo editor. Here you can upload a photo and quickly process it: including creating interesting drawing(art). What makes this service captivating is that it has quite a lot of the most unusual photo processing options: you can, for example, place your photo on the chest of Messi or Ronaldo, put your photo in a frame, give it a magical style, or make yourself a famous actor.
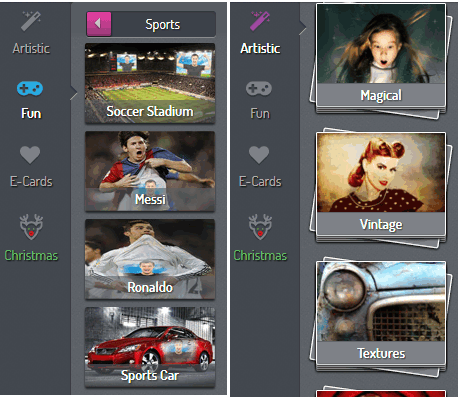
An example of processing is shown in the screenshot below: in my opinion it looks very realistic ☺.

Another interesting art // Photomania.net
PhotoFaceFun.com
Website with a huge amount various photo effects: here you can put your photo in a frame, make the photo a painted picture, place it next to some celebrity, etc.

Using the service is also simple: upload a photo, select an effect, see the result (in general, three simple steps).
Below are several examples of how the service works. Not bad at all?!

Several pieces of art: in the gallery, with Putin, an old drawing.
Note: If the service will not process your photo, convert it to another format. For example, I was faced with the fact that the service did not want to accept and process the GIF format, having saved the image in JPG (you can use Paint for this, which is available in all versions of Windows)- everything began to work normally!
PhotoFunia
A very good Russian-language service with a large collection of photo effects that can be applied to any uploaded photo. What captivates: the choice is simply huge! The photograph can be taken in black and white, drawn with a brush or pencil, placed in a frame, with a celebrity, in a TV show, etc.

Let me note that once you upload your photo, you can immediately try it in a variety of effects (without uploading it a hundred times). Comfortable!
Processing examples are shown below.

A few more interesting effects for the photo: pencil drawing, pendant, gift card (from left to right).
By the way, you might be interested in an article on how to make a photo collage- . If anyone doesn’t know, collage is when several photos are combined into one big one. It turns out very beautiful and informative, you can immediately find out how the holiday went (for example).
For now I say goodbye. Good luck everyone!
Additions are welcome...
It is not necessary to resort to complex graphics to get an image with meaning. In this piece, freelance artist Tom Starley used basic colors, shapes and brushes to create a well-balanced, euphoric mood with a hint of the theme of fetal life. Technically, it's not complex drawing - most of The photograph itself does the work, but the graphic additions enhance the emotions that are hidden in the original.
Lesson techniques will teach you how to skillfully apply a filter Overlap(Overlay) and tool Selective color correction(Selective Color) to change the mood of the photo. You'll also learn how to place shapes to support an abstract visual style, how to use brushes to create movement, and how to add depth to the foreground. We'll also use a great trick to highlight the hair.
Step 1
First, download the In The Moment brush set and install it by double-clicking on it.
We will need a photo of the model, preferably with a limited palette of tones. I took a nude photo from iStock.
Note: When choosing a photo, you can use the author’s recommendation or do color correction of the image yourself, for example, using a Gradient Map.

Step 2
Double-click on the background layer to unlock it. Create a new layer in Photoshop and drag it under the photo. Fill the layer with white. It's simple.

Step 3
Now we need to cut out the model and paste it onto a new layer, while preserving the background. Select a photo, zoom in to 300% ( Ctrl + “+”), then click R by selecting a tool Feather(Pen tool). Carefully create an outline around the model, ignoring the disheveled strands of hair - don't skimp, we'll bring them back later anyway.

Step 4
Once you have created an outline around the model's body, right-click inside it and select Generate selection(Make Selection). Click OK. We will divide the photo into two layers. Click Ctrl +X to cut and Ctrl +V to paste the selection onto a new layer. Reduce opacity(Opacity) of the background layer to 64%.

Step 5
Now you can bring back unruly strands of hair. Turn off all layers except the model. Select a tool Finger(Smudge tool), use brush size 1 or 2, set Intensity(Strength) to 95%, then check the box Sample from all layers(Sample All Layers) on the panel Options(Options bar).

Step 6
Redraw the strands that you could not cut out earlier. Moving in the direction of the hair, swipe with your mouse or digital pen along the cut ends, redrawing the hair (the more, the better). When you're done, turn the layers back on.

Step 7
In this step we will add color using a blend mode Overlap(Overlay) - it can be found either in the palette drop-down menu Layers(Layers palette), or in the menu Layers > Layer Style > Blending Options(Layer > Layer Style > Blending Options). Create a new layer, fill it with yellow (#ffff00), shrink opacity(Opacity) to 16% and set the blending mode Overlap(Overlay). Mmm, lovely shade of yellow.

Step 8
Create a new layer and use the tool Brush(Brush), adding scattered soft touches of pink (#ffe02b1). Reduce the opacity to 37% and set the blending mode Overlap(Overlay). Repeat the process, painting the model's body with a blood red hue, adjusting the opacity accordingly. Also select Overlap(Overlay). Group the layers and place them at the top of the document.

Step 9
Now that we've finished the background and added color, we can use our abstract brushes and shapes. Rather than giving precise instructions on how and where to place these effects, the following steps and tricks will give you the basics to get started with.

Step 10
Grab one of the paint splatter brushes in the tutorial. Create a new layer above the model and add a couple of splashes around her back. I chose white, but you can use any color you like.

Step 11
Using the brushes from the materials folder, add more splashes and shapes around the model, arranging them aesthetically. Vary the color, duplicate or rotate them, and deform the brushes to fit the contours of the model's body. Make sure to create a new layer for each brush - this will give you maximum control. This trick will also allow you to remove any brush in the future.

Step 12
Now add a layer below the model and repeat the previous steps, experimenting with the brushes. Try not to overdo it with effects - the less the better. The main subject of the composition is the model, so make sure she doesn't get overwhelmed by the effects. Don't worry about getting an exact resemblance to my example, experiment and have fun.

Step 13
If you don't like the result, stop. Take a break, think, come back to work later and experiment until you get the desired effect. Personally, I should tune in to the right way Relaxing music helps. Try and make your elements flow as if they were actually in the photograph.

Step 14
Now that the color and shapes have been added, we need to create circles of light that look like lens flares. Create a new layer above the model and set its blending mode to Overlap(Overlay). Select one of the sphere brushes, set it to a fairly large size, then simply click in different places in the document.

Step 15
Repeat the following steps with smaller brushes. This is a very simple but effective technique and is great for creating a sense of depth. Many of these effects are easy to apply, but they work great.

Step 16
You've added everything you need and it looks great now, but it would be nice to make the image stand out more. It may seem that some colors could be brighter, and some are not visible at all. In this case, use the panel Adjustment Layers(Adjustment Layer panel) and add a layer Selective color correction(Selective Color) above all others. It can be found in the menu Layer > New Adjustment Layer > Selective Color Adjustment(Layer > New Adjustment Layer > Selective Color).

Step 17
Set the Selective Color Correction layer so that it affects all layers below. This will make it easy to change each color - go through the settings and adjust them to get the desired result. And now everything is ready. Save your work, brag to your friends and share it in the comments.
This Photoshop tutorial will introduce you to a very famous trend in fine arts like Pop Art.
Next to pop art is the name of Andy Warhol, who was an artist, a photographer, a film director, and a publisher.
It was he who, in the mid-20th century, created unique collage paintings from completely unexpected things - from images of cans to such glamorous collages with Elvis Presley and Marilyn Monroe.
This style became incredibly popular at the time, resulting in countless imitations of this artist's work.
Because creating pictures in the Pop Art style is very simple, especially if you know Photoshop.
The technique we want to tell you about is that first a black and white stencil is made based on the original drawing. And then parts of this drawing are painted in very bright colors in different variations.
Any portrait can be turned into a pop art drawing, but a photo with clear boundaries is especially suitable for this.
It is advisable that the person in the photo looks directly into the camera lens.
1. Below is the process of cutting out a boy from his original background and placing him on a new one. It is important for us that the boy and the background are placed on different layers.
To quickly remove a monochromatic background, use the magic wand tool, if the background is multi-colored, then take the Pen tool


2. Most likely, you have already noticed that pop art images are famous for their very high contrast.
The following steps will remove a lot of small parts, so you don't want to be too careful as you go.
Place the bright background layer directly below the working layer (with the boy).
3. To make a high-contrast image, first make sure you are on the cutout boy layer and select Image > Adjustment > Threshold.
Adjust the slider so that the image contains enough shadows that all the main shapes and features are preserved.


4. Roughly select each part of the image that you will color later.
Press Alt + Ctrl + J to copy each part to a separate layer. Give each new layer a name. Change the blending mode of each layer to Multiply, and click OK.

5. Activate each layer in the Layers palette one by one.
For each, press Ctrl + click on the layer window and go to the menu Edit> Fill.
Click on the Use line, a window will appear where you can select the Color line. Thanks to this, a color palette will appear, where you can choose a bright, saturated color to your taste to paint over any part of the image.


6. In the “Layer Style” window (Layer Style, appears if you double-click on the layer), select the Color Overlay style (color fill) and change the blending mode there to Color. Select bright color and click OK.
7. When you repeat these steps for each individual section of the image, you will see that this is a real masterpiece in the pop art style.

8. Save this file in Photoshop format (.psd) and make copies of the layers where you did the coloring. In your layers panel, each area is painted a certain color. Now you can very easily change the color of the area using the Hue/Saturation function (Ctrl + U).
In the end, you can combine all the options into one large image.
This combination various options of the same image is very typical of the style of 60s Pop Art.