Quick navigation through the article
Has a kindergarten or school announced an exhibition of winter-themed crafts? Or do you just want to keep your little one busy with creativity on these cold days? In one material, we have collected for you 6 ideas for winter crafts from natural and scrap materials with step-by-step master classes, a selection of 60 photos and videos.
Idea 1. Tabletop diorama with a winter theme
A tabletop diorama will allow you and your baby to show off all your talents - from modeling to design. Moreover, using a variety of materials and objects: branches, cones, toys (for example, from Kinder Surprise eggs), plasticine, salt dough, cardboard, cotton wool and much more.
First of all, you need to come up with a plot for your diorama and plan the composition. You can recreate any of your fantasies or be inspired by our selection of topics with photos and small tips on making crafts.
Topic 1. “Winter in the forest”

The craft is made of polystyrene foam and plasticine. You can also make a bear from polymer clay or salt dough

If in kindergarten or school you were given the task of making a winter craft from natural materials, then you can use pine cones. They make excellent Christmas trees, owls, deer, squirrels and hedgehogs for the winter forest. By the way, we just have several master classes on making them

Want to make a simple craft more effective? Just light it up with an LED garland! To embed light bulbs in cardboard, you need to make cross-shaped cuts in it.

This winter forest Made entirely of felt. Animal figures can be placed on fingers

Topic 2. “Winter House”
A favorite theme at winter craft exhibitions. The house can be surrounded by a forest or a courtyard with paths, a gate, a rowan tree, a skating rink and a snowman. And the hut itself can be beautiful not only outside, but also inside.

This video tutorial shows a simple and quick way to make winter crafts from natural materials, namely twigs and pine cones.
Topic 3. “Christmas in a village/town”
If you build a couple of houses and connect them with beautiful streets, you will have a whole village or town.

The easiest way to make houses is from paper, or rather from printed templates that you just need to cut out, paint and glue. The next video presents step-by-step master class for making such a craft.
Topic 4. “The North Pole and its inhabitants”
Want to make a more original craft? We suggest making a diorama on the theme of the North Pole.

To make such a craft, download and print the templates (click on the picture to download), transfer them to cardboard, then cut, connect and paint the parts


Topic 5. “Winter fun”
Craft on the theme winter fun illustrates all the joys of winter. For example, sledding, making snowmen or playing snowballs. Lego men (pictured below), Kinder Surprise egg figurines and any small toys are well suited for recreating winter scenes. You can also make little people with your own hands from plasticine or polymer clay.

Topic 6. Winter sports
Another very original craft idea is a diorama on the theme of skiing, figure skating, hockey, bobsleigh, snowboarding. By the way, the Olympics in Sochi can serve as inspiration and a model for modeling.


To make these ski figures, download, print, color and cut out the templates (click on the picture to download the templates), then glue a toothpick to the hands of the men, and a popsicle stick to the legs.


Topic 7. Scenes from fairy tales
Choose your favorite fairy tale story and recreate one of its episodes. For example, this could be the fairy tale “12 months”, “ Snow Queen", "Morozko", "The Nutcracker", "At the behest of the pike."

Everything in this craft on the theme of the fairy tale “Po pike command» molded from plasticine and only the mill is assembled from matches

To make such a craft, you need to cut several holes in a piece of plywood and insert tree branches into them

This composition is dedicated to the theme of the ballet “The Nutcracker”. The figures in it are made of... clothespins. Unfortunately, clothespins with a round top are not sold in Russia, but you can order them on the Aliexpress website or use regular ones
From this video you will learn how to make a winter craft with your own hands based on the fairy tale “At the Order of the Pike.”
Idea 2. Skating rink with a controlled figure
The originality of this winter craft is that the skater can be smoothly “rolled on the ice” by moving a magnet along the back of the box.

What you need:
- A shallow tin can for cookies, tea, etc.
- Paper;
- Paints and brushes, pencils or markers;
- Paperclip or coin;
- Glue;
- Magnet.
How to do it:
Step 1. Decorate the tin box so that it resembles an ice skating rink: paint the bottom with blue and white paint and cover with clear varnish (glitter nail polish works well), you can place garlands and flags on top of the box, and snow-covered trees on the sides.
Step 2. Draw a figure of a girl or boy skating on thick paper or cardboard, then cut it out and glue it to a coin or paperclip.
Step 3. Attach a magnet to the back of the box. Voila, the skating rink is ready!
Idea 3. Painting made with prints
Drawing pictures with fingerprints, handprints, and even toes is a lot of fun, especially for preschoolers. All you need is imagination, gouache and a sheet of paper! In the following selection of photos you can see examples of such drawings.


Idea 4. Mini Christmas tree made of paper
Another winter craft idea for little ones is paper Christmas trees. They are made very easily and quickly, and you can use them in any way you like: as decoration for the same diorama, applique for New Year's cards or a panel to decorate a garland or Christmas tree.

What you need:
- A sheet of green paper and some brown paper for the trunk;
- Glue stick;
- Scissors;
- Sequins, rhinestones, beads and other decorations for the Christmas tree.
Step 1. Make a square from a sheet of green paper by folding one corner of the sheet as shown in the photo and cutting out the excess.

Step 2. Cut one of the short sides of the triangle into equal narrow strips, not reaching the fold about 1 cm (see photo above).
Step 3. Now straighten your workpiece and begin gluing the ends of the strips to the center fold line one by one, moving from bottom to top.


Step 4. Once you have secured all the stripes, fold and glue the bottom corner of the tree to the top. Further in the same place, but with reverse side, glue a small rectangle (tree trunk) cut out of brown paper.


Step 5. Decorate the tree with colorful beads, sparkles, buttons and other decor. If you wish, you can make several of these trees, glue loops to them, and then assemble a garland or decorate a real tree with crafts.
Idea 5. Snow globe... or rather a jar
Now we propose to make a real souvenir with your own hands - a variation of a snow globe. True, it will be made from ordinary glass jar. The child can give the craft to a loved one, present it at a winter crafts competition, or simply leave it on the shelf for beauty.

What you need:
- Glass jar with lid;
- A piece of foam;
- Glue (hot or “Moment”);
- Acrylic paint for decorating the lid (optional);
- Artificial snow or just sea salt, sugar, finely grated white soap or polyethylene foam;
- Figurines that will be placed in a jar;
- Foam balls or any white beads;
- Fishing line;
- Needle.
How to do it:
Step 1: Repaint the lid the desired color and leave to dry. In this project, spray paint was used to remake the lid.
Step 2. While the paint is drying, let's make a “snowfall”. To do this, you need to string several foam balls onto a fishing line threaded into a needle. Use tape to attach the snowflakes to the jar.
Step 3. Trace the bottom of the jar directly onto the foam, then use a knife to cut the resulting circle out of it. This circle will become the basis for the figures.

Step 4. Glue your figures to the foam circle, then glue the resulting composition to the bottom of the jar.
Step 5. Pour artificial or homemade snow into the jar, close it with a lid with snowflakes and enjoy the view of a winter fairy tale.

Idea 6. New Year card
There are never enough New Year cards, so we suggest making a few together with your child.

What you need:
- A sheet of white paper;
- A sheet of colored paper;
- Scissors;
- Glue stick;
- Markers.
How to do it:
Step 1. Fold a sheet of white accordion paper three times so that each top accordion layer is smaller in width than the previous one.
Step 2. Straighten your accordion, cut the sheet diagonally and slightly in waves as shown in the photo above, then assemble the accordion again. You have the slope of a snow-covered mountain.
Step 3. Now take a sheet of colored paper, glue the blank onto it and cut off the excess. Hooray! The postcard is almost ready.

Step 4. Decorate the mountain with Christmas trees, draw snowmen and skiers and finally sign the card.


Using the same principle, but using larger paper, you can make a winter craft for kindergarten.


Read to your kids Pushkin’s works “Near Lukomorye there is a green oak tree” and “The Tale of the Fisherman and the Goldfish” and make crafts on this topic.
DIY crafts on the theme “Green oak near the Lukomorye”
These lines begin the fairy tale of Alexander Sergeevich Pushkin “The Tale of Tsar Saltan.” The kids will remember these lines better if you and them make crafts based on Pushkin’s fairy tales.

To illustrate this story, you will need the following materials:
- thick cardboard measuring 24 by 35 cm;
- A4 sheet of white cardboard;
- paper towels;
- PVA glue;
- oak leaves;
- acorns;
- a paper bag in which grill coals are sold;
- acrylic varnish;
- hot glue gun;
- acrylic paints;
- colorless silicone sealant;
- pebbles and shells;
- semolina;
- bath salt;
- rectangle of artificial grass;
- golden chain;
- play dough;
- rhinestones;
- Kinder surprise toys;
- small chest;
- kebab skewers;
- dried flowers;
- carton.
In order not to wait for the varnish layer to dry on the reverse side, hang the leaves by their petioles on a rope using clothespins. Paint them in this position on both sides at once.
To glue the acorns to their caps, do it with a hot gun. Using pliers, cut pieces of wire of the required size, fold them, twist them closer to the bottom, bending these pieces here in the form of roots. At the top, twist several wires at a time to make branches.
Turn the coal bag inside out or use another paper one and place a tree trunk here. Twist the bag and glue it to the bottom frame of the tree in the form of a trunk. For branches, you need to cut strips from this package and also glue them to the tree branches.

Next, to create this Pushkin craft, you need to attach acorns and leaves to hot silicone from a glue gun.
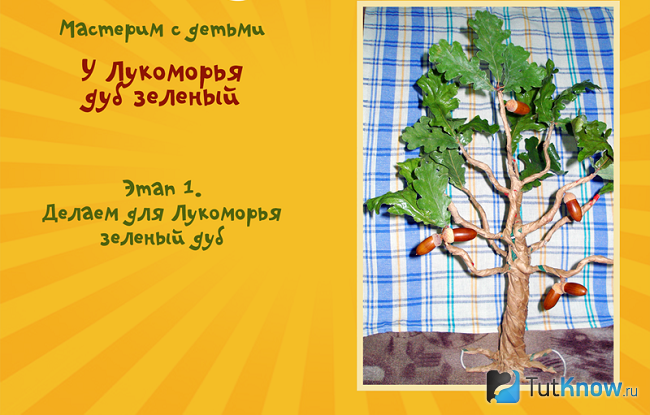
Now you need to think about where to place the craft. A large cardboard box is perfect for this. On the sides, glue to it paper towels soaked in PVA glue and water, taken and diluted in the same proportion.
To make a blank for the seashore, you need to cut out a trapezoid from white cardboard. Its smaller side is 6 cm, the larger one is 16, the base is the same as the width of the box. The right edge of this figure is located at an angle of 90 degrees to the base, and the left represents curved line shores.
Decide where it will end, where the sea is, cover this place with blue paint. Mix green and yellow bath salts with semolina and PVA glue. This mass needs to be applied to where the shore will be located on your cardboard. Before the glue dries, press small pebbles and shells into the area. Place this work near a heating device to allow the glue to dry.

When this happens, proceed to the next step. He's quite interesting. Show children how to achieve a 3D sea effect. You have already marked it with blue paint, now squeeze the sealant here. Make waves out of it by forming them with a teaspoon dipped in water. Where you want the waves to be foamy, place pieces of cotton wool under them, helping yourself with a toothpick.

Now it’s time to put the individual elements of this fairy tale-themed craft together. Using hot glue, attach the base of the craft to the cardboard, while on the right there will be a blank of the sea and the sandy shore. Glue on an artificial grass mat; by the way, you can buy it at the Fix Price store.
To this artificial grass base you need to attach the tree. To do this, pierce it with wire roots, bend them on the back side, and secure them. Hang on the oak gold chain, glue a mermaid or a cat onto the tree using hot silicone. If you don’t have ready-made figures, make them from salt dough and paint them.

This is such a wonderful and unusual job. While doing it, say the famous lines of the poem, then the child will quickly remember them.

If you want him to learn more, then make another Koshchei by taking a suitable figurine from the Kinder Surprise. Place a small chest next to it and fill it with coins.

To make a hut on chicken legs, make it from wooden sticks or matches, attach a wire with paper in the shape of chicken legs at the bottom. Decorate the building with dried flowers.

Crafts from the heroes of Pushkin’s fairy tale “About Tsar Saltan”
After the child has memorized the introduction of this magical story, it’s time to introduce him to the main characters, but first let him prepare the necessary scenery. Kingdom can be made using:
- burlap;
- scraps of fabric;
- glue stick;
- scissors;
- a needle.
- Help your child cut out a rectangle from burlap. Together with your baby, decorate the edges. To do this, first, on one side, you need to remove the horizontal threads with a needle to form a beautiful fringe. This is done on all four sides.
- Now you need to cut out fragments of houses, roofs, windows, doors from fabric. To ensure that the elements are even, it is better to first draw them on cardboard, then use these templates.
- The child will lay out the fabric elements on the burlap. If everything suits you, you need to glue them. If the work is small, then the burlap can be glued to a sheet of cardboard so that the base is dense.

To make the ships on which the guests sail in the fairy tale, take:
- foam;
- colored paper;
- wooden skewers or toothpicks;
- scissors.

When spring comes, the child will be happy to let them run through the melting puddles and streams that form. This is also great fun for the bathroom.
Repeat to your child the lines that the squirrel sings songs and gnaws all the nuts. The squirrel here is a soft toy, you will make nuts from foil, which needs to be given a round shape.

To make the main characters of a fairy tale, use ready-made dolls. It is enough for them to sew the appropriate robe, and now the king, Guidon, beautiful swan, who turned into a princess, appeared before our eyes.

You can make decorations Pushkin's fairy tales right on the table. It is enough to lay a tablecloth here, lay a transparent fabric in the shape of a lake, and place paper swans on it.

How to make a paper swan for “The Tale of Tsar Saltan”?
This skill will be useful to the child; in “The Tale of Tsar Saltan” this noble bird is one of the main characters. If you are crafting with young children, show them an easy way to make a swan.

- Draw the outline of the bird on the cardboard, extend its body below so that a small strip is formed here. It is needed to give the swan stability.
- If the cardboard is white, leave the blank in this form; if it is gray, then let the child cover it with white paper on both sides. You need to make a swan tail from it. To do this, cut out a rectangle from white paper and fold it like an accordion. The coils at the bottom are folded into a fan shape, glue them together and glue them onto the bird so that it gets such a beautiful tail.
- Let the child draw on the eyes and nose; now he knows how to make a swan out of paper.

As you can see, you need to take a square sheet, fold it first once diagonally, then along the second diagonal. Following the photo prompt, turn this blank into a beautiful bird.
There is another great option. Having made such a swan, place it in your summer cottage and perform a performance with your children based on Pushkin’s fairy tale.

Before making a swan, take:
- thick sheet of foam;
- light packages;
- scissors;
- wooden skewer;
- 2 rods of reinforcement.
Place the next trim as close as possible to this one. Decorate the entire swan in this way and paint its nose.
Insert reinforcement along the rod into the lower part of the bird, and drive their ends into the ground. But it’s better to first lay synthetic fabric on the soil blue color or a substrate of this color, cut this material in the form of a lake. Then fix the swan and flowers from plastic bottles here.
If the child is older, show him how to make a swan from origami paper. To do this, you first need to roll up a lot of blanks as follows.

Each of these triangular elements has two pockets and two corners, so they will be easy to connect together. The following step-by-step photographs show how to make a swan to illustrate Pushkin's fairy tale.

Assemble origami modules, starting from the bottom, lay them out here in a circle. After you make the body of the bird, you need to make two wings, and then make the neck, head and beak.
You can make a swan using the trimming technique.
To do this, cut strips from a white napkin, then shred them into squares with a side of 1 cm.
Each one is screwed onto a pencil and glued onto a swan drawn on cardboard. This base must first be lubricated with glue. Plasticine can be used to attach trim pieces. You need to knead it, coat the swan drawn on cardboard. If this is a painting, then folded squares are attached here using the trimming technique the right colors to decorate the background.

If you have enough time, then the swan for Pushkin’s fairy tale can acquire these luxurious feathers; they are cut out of paper and glued to a prepared base. The bird's neck can be decorated with cotton pads.

Theme of Pushkin's fairy tale “About the Fisherman and the Fish”
Another story in verse by Alexander Sergeevich Pushkin. Crafts based on this fairy tale can be made from the most unexpected materials.

To make one like this three-dimensional picture, take:
- bark;
- birch bark;
- cones;
- sticks;
- plasticine;
- yellow cardboard.
- Place a section of thick bark on a work surface and clean it of dust with a cloth. Let the child put a piece of crushed plasticine here and place chaga on top.
- We make the grandfather from a big bump, which will become his body, and a small one, which will turn into his head.
- Using plasticine, the child will attach sticks, they will turn into the arms and legs of the character. The waves are made from pieces of birch bark, which need to be twisted and fixed in this position on the bark using plasticine.
- The child will cut out a goldfish from yellow cardboard and draw scales, eyes, and other elements with a felt-tip pen. Let him attach the fish to the wave using a piece of plasticine.
- Using natural materials such as acorns, the child will make a grandfather from a fairy tale. Just let the adults drill holes in the acorns so that matches or toothpicks can be inserted here, which will become the arms, legs, and neck of the hero of Pushkin’s fairy tale. The stick and rope will turn into his fishing rod.
- Place the old man on the moss and cut out the sea from blue paper.

The theme of the fairy tale about the fisherman and the fish in crafts continues with the next master class. From it you will learn how to make a picture from threads. For this craft you need to take:
- sheet of cardboard;
- glue;
- brush;
- threads different colors;
- openwork braid;
- bead for the eye.
- First, you need to weave braids from threads. Now let the child draw the outline of a fish on the cardboard.
- Dipping a thin brush into glue, outline them with this substance, then glue a pigtail of yellow thread along the contour. On the body of the fish they will be laid out in the form of scales. Bow sponges are made from red braids, waves from blue and light blue ones.
- Here you can use either a braid of yarn or simply glue the threads. Edge the work with them by completing beautiful frame. Let the child glue on an eye from a bead, and make a tail from openwork braid.

This is such an interesting goldfish made from threads. It can be made from other materials.

To make such a sea dweller, take:
- foam egg;
- satin ribbon;
- beads;
- eyes for toys;
- colored pebbles;
- shells;
- Titan glue;
- white seeds;
- alabaster;
- wire;
- acrylic paints;
- glitter;
- polymer clay;
- patch;
- pallet;
- transparent nail enamel;
- pencil.
Weave the upper and two lower fins from wire and beads.

Instead of scales, glue seeds, pointing them in one direction so that the narrow tips are near the body. Start attaching from the tail side, gradually moving towards the head. Limit the junction of the scales with the face with red beads, attach it here.

Carefully apply glue to the tips of the seeds and sprinkle them with red and yellow glitter. Decorate the face of the sea dweller in the same way, using only yellow sparkles. Seal the whole thing on top with clear varnish.

Here's how to make the fish next. Twist a loop from thick wire and wrap it with adhesive tape. Pour diluted alabaster onto the tray and insert the lower part of the wire here. Wrap another piece of wire with blue tape, this is where you will attach the fish. Also put it in this solution. Paint the wave and frozen alabaster with blue acrylic paint.

To do beautiful tail goldfish, string beads of different colors onto a wire and bend this blank into a tail, glue it to the sea dweller.

All that remains is to decorate the voluminous work with seaweed made from polymer clay, shells, and pebbles. And here is the final result.

Now you can show your children how to make crafts based on Pushkin’s fairy tales. If you want them to see how you can make goldfish, turn on the following story for them.
It is suitable for very young children. If you need to learn how to make a swan for older children, a video lesson will help with this.
If you are interested in the origami swan, to understand the intricacies of the process, check out the third video.
![]()
Chukovsky K.I. - biography

His work is diverse, which is why Korney Ivanovich is called a children's writer, journalist, Russian Soviet poet, publicist, translator, literary critic, literary critic.
But the real name of the writer is Nikolai Korneychukov, and Korney Chukovsky is literary pseudonym. He was born in St. Petersburg in 1882 on March 19 (31). The mother of the future writer, peasant woman Ekaterina Osipovna Korneychukova, was a servant in the family of his father Emmanuel Solomonovich Levenson.
As is now commonly said, they lived in a civil marriage; it was not officially registered. Nikolai is the second child in this family. Marusya was born before him. After three years of civil marriage, the father abandoned this “illegitimate family” and married a woman who was from “his circle.”
The mother of the future writer moved with her children to Odessa. He spent his childhood here and in Nikolaev.
My creative activity Korey Ivanovich started at the Odessa News newspaper, for which he wrote articles. Then he married Maria Borisovna Goldfeld and together with her in 1903 he went to London as a correspondent for Odessa News.
Chukovsky independently learned English from a self-instruction manual, was the only English speaker in the publishing house, so he was sent to work in London.
The correspondent was promised a lot of money for those times - 100 rubles a month. This business trip contributed to the further development of the writer, because here Chukovsky was able to read books by English writers in the original; the writer’s biography was supplemented by the fact that he studied the works of Thackeray and Dickens.
But upon his arrival in Odessa at the end of 1904, even more global events awaited him - the revolution of 1905.
Korey Ivanovich seriously took up criticism and after the revolution of 1917 published two books - about Mayakovsky and Akhmatova, about Blok. At the same time, he began many years of work on Nekrasov, his favorite poet. And back in 1908, he published works on Chekhov, Blok, Balmont, Bryusov, Kuprin, Sergeev-Tsensky, Artsybashev, Gorky, Merezhkovsky and others.
Koren Ivanovich Chukovsky wrote his first fairy tale “Crocodile” in 1916. And he published “Cockroach” and “Moidodyr” in 1923. A year later, a poetic work for children “Barmaley” was published.
In the early 1930s, Korney Ivanovich became interested in studying child psychology, how they learn to speak, and wrote the book “From Two to Five.”
In the 60s, Chukovsky decided to write a Bible for children. But at that time the authorities carried out anti-religious propaganda, and the project did not materialize. At first he was told not to write the words “God” or “Jews” in the book. Korney Ivanovich replaced the word “God” with “Wizard Yahweh.”
The book was printed, but did not see the light of day, since the authorities destroyed the entire circulation. This is what Chukovsky, whose biography is full of drama, experienced. After all, he lost his beloved daughter Masha, who died in childhood. The writer often mentions her in his works, calling her Murochka.
In addition to her, the poet had a daughter, Lydia, who also became a writer. Son - translator and prose writer - Nikolai and son Boris, who died during the Great Patriotic War.
Streets were named in memory of the great writer, monuments were erected to him and the heroes of his works. different cities. An asteroid is named after Chucocolla.
How to make a miracle tree from Chukovsky’s work?
Now that you have found out for yourself and told the children about Chukovsky’s biography, learn his poems together. To make them better remembered, during creative process Make a miracle tree with the kids.

To make it, prepare:
- thick wire;
- salt dough;
- paints;
- thin tape;
- artificial moss;
- glue;
- green corrugated paper;
- scissors;
- miter or pencil;
- brush.
Cut rectangles with a side of 2 cm from corrugated paper. Winding the blanks onto a pencil, make trims out of them. Attach those to the branches as leaves.
Now you need to let the dough dry completely, only after that paint the tree and shoes. The child will do this with pleasure.
Glue moss down to the base or paint the trunk circle in green. You can sculpt a cat out of dough and plant it under a miracle tree.

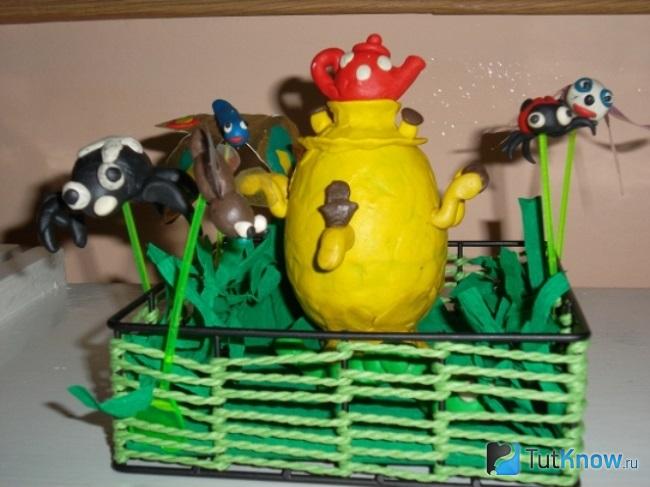
Fly Tsokotukha - crafts, three-dimensional applique, costumes
Read lines from this work to children from infancy to show that the children have developed well. When they can speak, they will repeat the lines after you. For them to memorize them, together make a character from a fairy tale in verse - the fly Tsokotukha.
Craft

You can create one in just 15 minutes from scrap materials using egg cartons. Here is a complete list of what you need:
- cardboard boxes for eggs - 2 pcs.;
- gouache;
- colored cardboard;
- wire flagella;
- scissors;
- pom-poms;
- ready-made eyes;
- glue gun;
- brush.

Now he will trim off the excess.

The flagella are twisted to give them the shape of wings: round, triangular, square, heart-shaped.

To attach them to cardboard blanks, make 3 pairs of holes opposite each other in each one.

This is where the legs need to be threaded and secured. The eyes are glued onto the pompoms, and these blanks are glued onto the head of the Tsokotukha fly. Glue the wings to the back.
The silicone rods of the hot gun are very hot. To prevent your child from getting burned, glue the elements yourself, and he will watch and learn.
The result was a wonderful craft, the fly Tsokotukha, or rather, several characters at once. Children can also create a three-dimensional applique. This type of needlework is suitable for younger kindergarten age.
Volume applique
If the kids are small, draw them with a simple pencil elements of the future picture. Prepare the following materials with them:
- paper napkins;
- cotton pads or cotton wool;
- glue;
- dark yarn;
- colored and simple pencils;
- colored cardboard.
- clatter;
- samovar;
- trees;
- cobweb;
- mosquito, other guests.

Then they will do it themselves. Instead of apples, you can also glue crumpled pieces of napkins, but pink color. Let them paint the tree trunk with a brown pencil, and let them paint the samovar with yellow. They will make a basket with flowers from napkins, because it is Tsokotukha’s birthday.

When all the characters are colored, show your child how to glue the yarn to make a web. The spider needs to be drawn on cardboard, cut out and glued to a web of thread.

To make clouds, have children roll cotton balls or cotton wool into circles. fill in a pencil sketch of clouds with them. All that remains is to place the volumetric applique in a frame and you can hang it in the most visible place.
Tsokotukha fly costume
If you need to quickly make a Tsokotukha fly outfit, put a yellow blouse, a black skirt and a dark beret on your child. You need to make 2 holes in it and insert black antennae made of soft wire here.
All that remains is to make the wings. Here are 2 options for making them.
Option #1
Cut out the wings from white mesh. Tuck the edges under and stitch to leave a small gap on all sides. Insert the wire here and shape the wings.
Option No. 2
It is suitable for those who do not have a sewing machine.

For these you will need:
- pink nylon;
- aluminum wire;
- gray marker;
- pink satin ribbon;
- scissors.
You can sew a piece of white fur to one and the second wing to connect them at the top and decorate.
And of course, the Tsokotukha Fly needs to make the “money” that she found. To do this, take:
- cardboard;
- foil;
- glue;
- scissors;
- marker or wooden stick.
You can also complement the Tsokotukha fly costume with a head mask like this.

To do this, cut out 2 strips from black paper - one along the volume of the head, the second will be located transversely. Leave some extra space for gluing the ends. Cut out 2 eye circles from gray paper. Using a ruler and a black felt-tip pen, draw a grid on them. Glue these “eyes” to the base.
Experienced craftswomen can sew a clattering fly costume.

You will need:
- black fabric;
- silver jersey;
- silk ribbon;
- braid;
- wire;
- white organza or tulle.
The wings are created in the same way as described above, but the edges are trimmed with braid. All that remains is to put white tights on the girl, black lacquered dolls, and the image of the character is created.

Using fishing line, you can create amazing outfits, including the Tsokotukha fly costume. If you make wide ruffles, tuck them on all sides along the edge and thread them into the resulting drawstring, then you will get beautiful flounces. You can do it differently by using knitted fabric. It is overlocked along the edges, it is shirred, and ruffles are obtained.
All that remains is to add wings to them. Enlarge the following template or transfer it to squared paper.

If you know how to crochet, then you can knit a clattering fly costume using this tool. Cosmetic makeup will complement the look.

Here is an example of a Tsokotukha fly costume made of black and yellow fabric. On the head are eyes made of cardboard. A mesh is applied to them, then they are glued to a paper strip, and wire antennae are attached here.

Her image can also be made from paper or newspaper tubes.
They are painted, when it dries, the blanks are folded into various knots to create a fly from a fairy tale. From the same material, make a samovar that the fly bought at the market.

Kids can also make it from plasticine. To play puppet show, they mold characters from this material and attach wooden skewers to them. Holding them will teach the heroes to move.
All this is put into a wire basket, and its sides are braided with thread.
“Doctor Aibolit” by Korney Chukovsky - crafts
Children will also know this work by K.I. Chukovsky very well if you make a thematic craft with them.

For this you need:
- cardboard shoe box;
- plasticine;
- white cardboard;
- cotton wool;
- felt;
- maple seeds;
- glue gun;
- bandage;
- toothpicks or wooden sticks;
- wrapping paper or wallpaper;
- dye.

The pictures show how Doctor Aibolit is made.
The master class will tell you about two options for creating it. For the first one, cut out a triangle from white cardboard, roll it into a cone, and glue the sides to each other. Let the child draw the doctor’s facial features with a felt-tip pen and glue cotton wool in the shape of a beard and hair. He will roll up a strip of cardboard, draw a red cross on it, and glue this cap on Aibolit’s head.
You can sew it and a felt headdress, embroider a red cross, facial features, and glue cotton wool, which will become a beard and mustache.

Cover the box with wrapping paper or a piece of wallpaper. Glue Aibolit and tree branches along with seeds onto this frame. Attach a bug sticker to the branch. After all, according to the story, not only large animals, but also bugs and spiders came to the good doctor for treatment. Repeat the lines of the fairy tale while making crafts with your child so that he remembers them well.

He will be happy to make a fox, who also used the services of the fairy-tale doctor. The body is a bump, but you need to glue on the head, ears, tail, paws from orange plasticine, and make the bunny from white.

Trim the wooden sticks so that they are the same length. Paint them or cut off the top of the toothpicks. Glue or stick this fence picket. Decorate it with a flower.

Make a stool for the bunny from wooden sticks. Glue a painted popsicle stick onto the “tree”, this sign says “Limpopo”.

When good doctor Aibolit will arrive there and will be met by African animals. Among them is the ostrich. The child will make his body from a foam ball, to which he will attach a neck, head, paws from plasticine, wings from maple seeds, and legs from painted wooden sticks. You need to tie a bandage around your neck because the ostrich is sick.

It’s not difficult to make a giraffe from plasticine, looking at the photo clue.

You can make a craft based on a fairy tale, consisting of two parts. Place one Aibolit on the left side, and a second one on the right. Near the first there will be domestic animals, near the other - African ones. Then glue the shells to the ocean shore where the shark swims out.
If you need to perform the play “Doctor Aibolit”, you can use the child’s existing soft toys - these are animal characters. You can turn a doll into a doctor by giving it appropriate makeup and sewing clothes.

Other tales by Chukovsky
"Cockroach"
This is another fairy tale in verse by a great writer. Drawing is a great way to remember it. The work will be even more interesting if the child glues this to his hands. negative hero plastic fork and knife.

You can use the quilling technique to create another work based on Chukovsky’s fairy tale. The remaining details are being completed.
The next craft will teach the children their first sewing skills. For it use:
- fairly dense fabric;
- padding polyester;
- soft wire;
- cardboard;
- glue.

The head and body are one-piece. You will need 2 identical pieces made of fuzzy brown fabric. Stitch them along the edges, leaving an unstitched space at the top. Place a padding polyester through it, sew it up, after inserting 2 wire antennae here. Make the front and hind legs from it, put their upper tips into the side seam, and sew them on.
The paws are made of fabric, they look like house slippers.
Cut out the nose from burgundy fabric, glue it to the insect's muzzle, and on it - the eyes are made of white, and the pupils are made of black cardboard.
The character from the fairy tale “The Cockroach” was so soft and fluffy, and not at all scary.

After this story, you can tell the children another one.
"Stolen Sun"
This poem begins with the crocodile swallowing the sun. Read these lines to the children and show them how to make a craft for which you need to use:
- green cardboard;
- pink colored paper;
- 2 wooden sticks;
- black felt-tip pen;
- glue.

For crafts, you can take wooden skewers for shish kebab or sushi sticks. The sharp ends of the skewers are cut off.
Cut out the front and back of the alligator from green paper. Circles are drawn on these parts - a pattern on the skin. Eyes are depicted on the face. Cut out 2 strips from colored paper. Place 2 sticks between them, glue the paper together, and fold it like an accordion. By holding the skewers, you can change the size of the crocodile, making it larger or smaller.
But then the bear helped return the sun to the animals. Let the children show this moment on paper. The luminary of the day can be depicted in a very interesting way by dipping one side of a matchbox in paint and leaning it against the paper in a circle, making rays.

"Confusion"
And a good crocodile helped put out the fire, albeit with pies, salted mushrooms and pancakes. Such a funny picture can also be created by children's hands. Invite them to make an implication on cardboard, paper or fabric using felt.

"Moidodyr"
Another tale by Korney Ivanovich Chukovsky. Kids will love making a cleanliness warrior from a rectangular yogurt container. Here's what you'll need:
- a jar of yogurt;
- plasticine;
- sheet of blue cardboard;
- scissors;
- cotton wool

And here is another Moidodyr. The craft is being created in an interesting way. Take:
- 2 small cardboard boxes of different sizes;
- PVA or other glue;
- colored paper;
- tow;
- markers;
- scissors;
- handkerchief or cloth;
- plastic basin for toys.
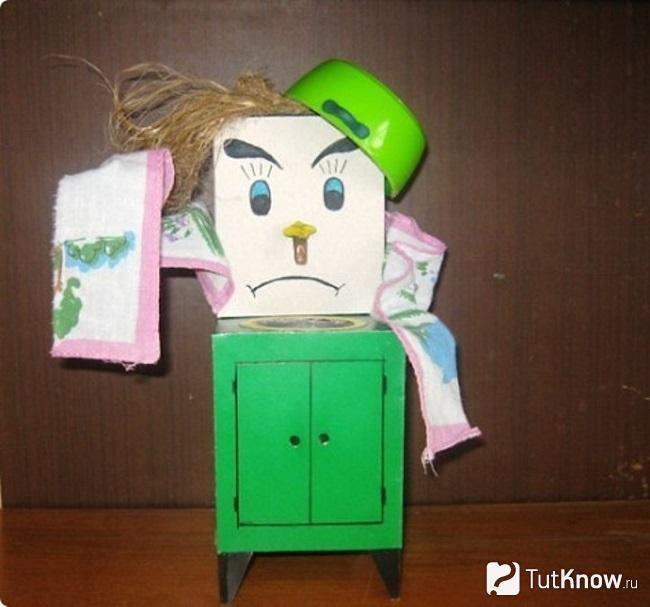
Let the child draw a door and cabinet handles on the large side of the green box, and a sink on top, or make it out of light paper and glue it to the top. White box Moidodyr's face. On it are drawn: eyes, a crane mouth, stern eyebrows, a nose. Now glue this light box onto the green one, on the end.
Sew a towel from fabric or place a handkerchief on the hero’s shoulder. Place the basin on the other. And if you need it for a matinee, you can also create it from cardboard boxes.
Here are some crafts you can make based on the fairy tales of K.I. Chukovsky. To interest kids, show them cartoons based on books. children's writer. While watching entertaining stories, make crafts together.
![]()
Elena Barsukova
Children senior group participated in the competition crafts"Fairy tales wondrous light", which is held every year by the House children's creativity. The guys worked hard and the work turned out interesting. During the work we remembered a lot fairy tales, some even staged it. In some fairy tales They came up with new stories, giving the characters completely different qualities.
"Geese - swans" plasticine, natural material Belustin Dima 6 years old

The bun is rolling" colored paper, colored cardboard, ball of thread Popov Alyosha 6 years old

"Bouquet" beans, plasticine, colored cardboard, pencil shavings Bormova Polina 6 years old

Fairy tale"Geese - swans" plasticine, natural material, cardboard Zevakhovs Sasha and Katya 6, 7 years old
During production crafts a variety of materials were used.

"Golden Fish" computer disk, colored paper. self-adhesive Becker Bogdan 6 years old

"Theater Fairy tale" cardboard, small toys, fabric Shcheglova Dasha 6 years

"Country of Smeshariki" plasticine, Lego parts Zevakhov Sasha

"The bun is rolling" braid. cardboard Ivanina Albina

New Year's fairy tale"salt dough Walter Diana

"The Adventures of Luntik" felt Kokov Savva

Moydodyr" cardboard, thread, dishes Bekker Bogdan

"Magic mirror" decoration made of satin braid Baikalov Vova
Publications on the topic:
“There are many fairy tales in the world, Sad and funny, We cannot live in the world without our favorite books.” In order to attract public attention to literature.
On July 8, Russia celebrates a very soulful and profound holiday - the day of family, love and fidelity. Family - so many pleasant emotions.
Craft from natural material“Here is my village,” performed by Ilya Artikulov, age 6 years, teacher Shatokhina V.V., Samara region, city o.
Every year the House of Children's Creativity of the city of Sorsk holds a city exhibition of applied and technical creativity. Our group "Sunflowers".
Every year in kindergarten An exhibition of crafts made from natural materials "Autumn Fantasy" is being held. The main goal is to unite children and parents.
“Victory Day, how far it was from us.” (from the song) 70 years have passed since that solemn and great day, and Soviet people everything is more beautiful.
In the falling leaves, bright, What a miracle? -let's ask- -For gifts Autumn is a rich time of year! With the onset of autumn, the gardens and vegetable gardens ripen.