1 pic. So, in this master class you will completely change your attitude towards colored pencils! Colored pencils are a very convenient material to use, because you can have very large number shades, including those that appear by superimposing colors on each other. But when using pencils, you need to know their features, for example, you should not put pressure on the pencil at the beginning of work, otherwise you will not erase it or cover it with a different color. With this material you need to use the principle - from light to dark. But first, let's compose the still life. Let's start with the horizon line. Then using the line geometric shapes Let's outline the approximate shape of our composition objects. Let's start with the dish.
2 fig. Well done! Now it’s important for us to build a dish for the fruit of the correct shape. We find the central axis, it should be straight and even, we find a point on it at the level of the expected neck of the dish and draw a horizontal line through the point, we do the same at the base of the leg of the dish. Very good! We take a ruler and measure equal parts from the axis horizontally. We make ellipses and connect lines. See picture. Erase the auxiliary lines and outline the dish.

3 fig. Find the direction of the fruit using the diagonal axis and refine the shapes and details of the apple, pear and plum. And start drawing grapes with a brush, after its shape, adding oval grapes from top to bottom, some of them overlap each other for realism. Draw the tails.

4 fig. Before you start working with color, let me remind you that this is not a coloring book and you should be shading, not coloring! At this stage, you need to press halfway on the pencils. You only need to shade according to the shape of the object. We take pencils and apply the basic shades of objects, look at the drawing.

5 fig. At this stage, you should add density to the still life objects by introducing new shades. Your stroke now matters more as it is important to make the still life more real. It is necessary to deepen the shadows using blue, purple, green and brown. Show the falling shadow of objects and the table with strokes. Work on the details.

Description:
The introduction is long, boring and uninteresting to read, so I’ll get straight to the point. 1. Tools. First of all, we need a reference. IN in this case This is a photo found on the Internet. You can pose from nature yourself - it’s much more useful to draw. Try to look for a reference where painting (drapery, apples) and...
The introduction is long, boring and uninteresting to read, so I’ll get straight to the point.
1. Tools.
First of all we need reference. In this case, this is a photo found on the Internet. You can pose from nature yourself - it’s much more useful to draw.
Try to look for a reference where both painting (drapery, apples) and tasty details (leaves) can be used. Some details, you understand, are not always good, especially in the early stages of learning - behind their drawing the picture itself is lost. Do you want realistic rendering? Take your camera and take pictures. Our task is to present the nature (or reference) as we see it, and not as the camera sees it.
(the ref has a rather sparse range of colors, so I decided to depict the nearest apple as yellow)
Also, of course, we will need various art supplies, such as:
- watercolor (in braces, in tubes - whichever is more convenient for you);
- watercolor paper, prepared for work (that is, stretched onto a tablet), size - larger than A3, quality - again, to your taste, we don’t have much choice in the city, so I can’t recommend anything here;
- masking liquid (not entirely necessary in this case);
- easel (I personally hate painting on a table; I’m more accustomed to working on a vertical plane);
- office supplies - brushes (preferably squirrel brushes, No. 2, No. 3 and No. 4 for the background), a jar of water (which should be changed as often as possible), a palette (what type of palette to use is a matter of your habit), pieces of paper for proofing, clean a rag and a ruler, a pen (if you use masking fluid).
2. Pencil sketch. Getting started.
This lesson can help you in constructing a pencil sketch of a still life: Linear-constructive drawing of a still life.
First, we determine the boundaries of our still life: the lower boundary is where the yellow apple lies; top, right and left - where the leaves reach as much as possible. Using a pencil (ruler, but better train your eye), you can immediately determine from the photo how much larger this rectangle will be in width than in height. Measure distances in comparison with some specific value. 
Then mark the places (traces) where each of the objects is on the table - estimate how much further the glass is from the red apple than the red apple from the yellow one. Then, again, using a pencil and an eye, determine the boundaries of each object (since the glass is a symmetrical object, we also mark its center line - exactly in the center of the rectangle). I advise you not to use a ruler at all at these stages. 
Schematically outline the main branches autumn bouquet that the leaves hold on to. If you go a little beyond the intended border, it’s not scary. The main thing is a little. 
We are building an apple. For the first time in my life I decided to try drawing; faceted; fruits. It turns out interesting, although many of my friends (including my dad) didn’t like it. I probably won’t be able to tell you the algorithm for building an apple in this way yet - you just need to feel its shape, all the bulges and dents. Fit the apple within the boundaries outlined earlier. Also determine the width of the bottom of the glass (even if the bottom is not really visible - by eye) and symmetrically draw two inclined lines - the future walls of the vessel. 
The second apple is the same: 
Here I immediately outlined a fold of fabric that slightly covers the bottom of the fruit.
Assess the location of all the leaves and try not to draw them separately, but to fit them into big picture. Outline your imaginary boundaries of this bouquet. Of course, many things will not match the reference, but it doesn’t matter. 
At this stage, you can already erase the general boundaries of still life, which we outlined at the very beginning.
The most time-consuming step is drawing the leaves. Just study the reference more carefully, the abundance of sizes, shapes and inclinations of each leaf. Don’t bother too much with the composition - it’s already well placed in the photo. Don’t get hung up on one branch - draw the whole bouquet at once, first schematically, with sketches, and later, drawing out the details. I advise you to start drawing a leaf from two lines - the main vein, which runs along the entire length of the leaf, and the middle line, which is parallel to the vein, which characterizes the widest part of the leaf. But since the majority of the leaves are inclined towards us at an angle, these two lines will not intersect at a right angle. 
We also outline the tails of the apples.
And the last stage of the pencil sketch is a little stylization. Just an insert in the form of a straight ribbon with elements of red and tan leaves. 
Use a washing eraser to slightly lighten such moments as the edges of apples, for example, or the same stylized insert, so that it does not hurt the eyes and does not appear strongly under layers of watercolor.
3. Let's start with watercolors.
First, "buy" future job in clean water - just wet the entire surface of the paper evenly. It is advisable to do this on all watercolor works before starting with paints: when drawing with a pencil, the paper is covered with a thin layer of fat from the fingers, and this can sometimes prevent the water and the watercolor from adhering well to the surface. 
(I wetted the work twice - in the evening, after sketching, and in the morning to write the background wet; you can easily do it once)
For the background, we use ONLY a palette and ONLY diluted watercolors in order to prevent the appearance of bright colored spots, which can’t be washed out or extinguished without dirt. We mix on the palette the colors that you see/would like to see in the photo. For example, I decided to make the background not blue, but more bluish, and leave the rag behind the stylized insert completely white. The background didn't work out for me, but I'm sure you'll do much better.
I took the following colors - bluish blue, grayish turquoise, orange (with a small amount of purple added to it to reduce the brightness), heavily diluted lemon, a little purple.
We begin to paint the background using vertical strokes. I saw the folds there quite abstractly, especially considering that the background should be minimally contrasting and light (since the leaves and apples are dark). We write wet. Make sure that the paint does not flow where it is not needed - I;let; it is only on some leaves. If you notice that a drop is collecting at the bottom and is about to roll down, quickly soak the brush with a rag/mouth and collect this drop without touching the paper. If you need to lighten something - while it is wet, you can also wet the brush and dry it to collect moisture from the paper - the paint will lighten, but you will not be able to completely remove it.
On the first layer of paint, I would not recommend making too much difference in tones or soaking anything. The first layer is a kind of lining under the main one: it gives direction to color and shape. 

On the right, I left torn edges - a habit of not painting completely. They are done with a semi-dry brush with paint, sideways, on a dry or slightly damp surface.
Let me remind you: the first layer is painted with very diluted paint, and it ends up very light. 
(I did not specifically process this photo in Photoshop - I did not increase the contrast so that it would be clear how light the background actually is)
We paint the second layer dry (we wait for the first one to dry), and we paint not everything that we painted over first. Here I added shadows and “folding” to the right of the leaves, to the right of the glass I began to draw a fold (by the way, we add crimson shades here and there - as they will be on the leaves - so that the image is harmonized in color, and the bouquet does not look cut out later), I added the shadow from the apples and from the leaves on the left (to the left of the apple in the fold there is also a red color - then I “muffled” it a little - I washed it out with water when it was dry). I also started drawing the drapery under the apples - it is white, which means the reflexes are very clearly visible on it. In this case, I deliberately exaggerated these reflexes, adding such pseudo-reflections from the apples so that the rag did not stand out too much for its “cleanliness,” so to speak. 
Then, with the third layer, I added a shadow to the fabric from the rightmost leaf (the large one), strengthened the shadow of the fold above it, and muted the place that I thought to leave unpainted (where the torn edges are). Don't be lazy to step away from time to time, post your work and evaluate it. I do this probably after every two or three strokes, especially in the background. 
Then I saw an epic fail in this work and thought about abandoning it altogether. Is the background terrible? Of course. But, in essence, the background plays virtually no role here - that’s why it’s the background. In addition, you need to evaluate work that has already been completed, but for now this is just the beginning.
I decided to leave the drapery for now and move on to the objects and leaves themselves.
As I already said, I leave the background, since I will always have time to improve it, but in no case should I clutter anything. In general, if you don’t like something in your work, leave it, draw something else, but don’t try to correct it several times in a row. The work will lose its transparency and watercolor quality.
A little about planning. The drapery is the background, the glass with leaves is in the middle, and the apples themselves are in the foreground. How to transfer plans? There are many ways.
One of them is layers watercolor paint. The fewer layers, the further away the object is. To reduce the number of layers, you need to immediately paint with more or less concentrated paint, trying to convey all the colors, shapes, and tones of the object the first time. To add more layers, we use heavily diluted paint, achieving brightness and color saturation by applying these layers.
Another one is contrast and detail. Look at the finished version of this work. Notice how little detail the drapery has, especially behind the leaves and to the left. Literally one coat of paint, and virtually no contrast. Now switch to the leaves. Are there any details? Many. Layers? Three or four for the closest leaves, and two or three for those distant to the left and below. The only downside is that the veins are too light, which should have been toned down even more. The apples themselves are very stingy in detail (I can’t convey the mottled texture of their skin in watercolor, that’s for sure), but their segmentation, clarity and strong contrast (especially in the yellow apple - a white reflex, a very dark shadow) move them forward.
And one more thing is color. Remember that red brings things closer and blue makes objects farther away. That is why I liked this photo - I knew that the picture would turn out voluminous due to the fact that the drapery is blue and the main objects are red. But still, I painted the leaves, often adding blue so that they would not come into the foreground.
I'll start with the glass. In it, I also liked the highlights on the right in the photo, and the way the leaves were visible through the glass. This is what we will try to convey. To begin, fill the glass with water (sounds good, if anything, I mean - we wet the surface of the paper within the boundaries of the glass) and draw a color lining, leaving almost white areas on the right for the masking liquid, on the left - a blue reflex from the fabric, and on the bottom, closer to apple, also the color saturation and tone decreases - to visually distance the glass.
We use the blue, orange-brown color “Mars Brown” left from the drapery, for dark shades an irreplaceable mixture of purple and orange, a little crimson and just orange. 
We also take into account the pattern on the glass. True, I inadvertently bent it in the other direction, but no one has noticed this little thing yet
We apply the masking liquid - on the right, where the highlights are - generously, a little in the picture, just a little to the left and above, along the edge of the glass. ATTENTION; We wait until the paper is COMPLETELY dry before using masking on it - otherwise the film will peel off along with the paper (many people had this problem, including me). 
It’s better to apply it with an iron pen - once you’ve dipped it in, lightly tap the pen onto the piece of paper (lightly tap it) to knock off the excess. After the liquid on the pen dries, it is very, very easy to peel it off with a single film, unlike with a brush. In addition, the pen can draw very thin and neat lines.
With more saturated tones we add contrast and shadows inside the glass, but do not forget to leave some places (for example, orange - where the leaf inside the glass hits the light). Also, along the way, I worked a little on the white drapery under the apples - added color to the right, finalized the folds. 
The film of liquid can be removed; where it is too light, dim it.
Leaves.
We paint them according to one general principle: moisten them with water -> color lining in the wet -> apply veins with masking liquid -> another two or three layers of finishing in the dry.
The most important thing to remember is that when you are finalizing, you should not change much of the color that was on the lining. For example, we started with large leaves on the right (and a few small ones on the back). As you can see, the lining contains blue, and yellow, and crimson, and orange colors, except that there is no green one. Firstly, do not forget about the total volume of the bouquet of leaves - the light falls from the right and from above, and from the front, and not from the side - that is, the leaves (especially the central one) will be light and contrasting both in color and tone. Secondly, when you paint the second layer, you should not use orange or yellow on, say, a blue lining - it creates dirt. Try to simply enhance the brightness of the colors, adjusting it here and there. This is watercolor - in this technique, everything, starting from the very first layer, will be visible through subsequent layers. Thirdly, don’t rush and don’t overcook the leaves. It’s better if it doesn’t work out, leave it for later - you’ll always have time to improve it. Fourthly, in subsequent layers, leave more and more space “not painted over” with this layer.
Wet lining: 
Veins in a mask (not all veins are visible on all leaves): 
Second layer (orange-yellow on the yellow lining, blue on the blue): 

Third layer - leave places where the second one is visible: 
With the fourth layer we enhance some shadows. 
Then carefully remove the film (as soon as the paint dries!). We see that the veins are too light. Then I will mute them at some stage.
Another tip - apply the next coat of paint only when the previous one is COMPLETELY dry, in order to avoid dirt and grime.
And so, piece by piece, we work through the whole bouquet. It would be more correct to write all the leaves at once, but I’m not at that level yet - my nerves wouldn’t hold up.
We add variety along the way: green and blue flowers, vary the tone of each leaf. 


Now there are leaves that are more distant from us. We will not use masking fluid for these. The veins turned out because I tried to make do with the lining and one (maximum two) layer, in which I skipped places “by hand”. 


I also added a shadow from the right large leaves on the drapery, to the right of the cup. Along the way, I kept working on the background here and there where it didn’t suit me.
In approximately the same way as the leaves, we draw a stylized insert (without masking). 
There is absolutely nothing left.
Apples.
There will be a lot of layers on the apples, especially the yellow ones. Don't be afraid. Just use less saturated colors.
I'll start with yellow. To begin, just like on the leaves, wet the apple and draw the lining. 
And then I, piece by piece, and you, try to completely work on the apple with the second, third, fourth, fifth and even sixth layers. Don't overdo it. Remember that you are using relatively thinned paints.
In order for the fruit to shine, you need to take into account a lot of reflexes and highlight (I applied it at the very end with white gouache).
Diagram of where, where and what color the reflexes should be: 

So is the red apple. With the last layers, as on the leaves that we painted without a mask, try not to cover the entire apple, but leave the layer “below” visible here and there. 


Rice. 1
This lesson will be useful for beginning artists who want to paint a still life with gouache. Beginners will learn some secrets of drawing surfaces and textures, and will allow them to see in practice the main rules of painting.
What you will need:
1. Paper (A3 format). Whatman paper is ideal.
2. Brushes. You need to prepare three flat synthetic brushes (small, medium and large), as well as a medium bristle brush.
3. Artistic gouache. Poster gouache is not suitable for painting - it dries quickly and forms streaks. Gouache should be good quality, so it is best to purchase paints in specialized art stores.
Stage 1
First, a composition is created with a simple pencil with a soft stylus. It’s better to start by designating the table plane horizontal line. When determining the height, it is recommended to rely on Fig. 1. The far corner of the table is slightly visible on the right - it needs to be outlined diagonal line. Then, in compliance with the rules of construction, objects are outlined on the table. Light lines indicate the fabric and its folds. It is important to observe the shape of objects and their location relative to each other.
When the pencil sketch is ready, you can start coloring it. It is better to start with a general background - apply the first layer of paint, making short strokes with a large flat brush. Afterwards the main tones are thrown onto the jug.
Important! There is no need to strive to completely and “perfectly” paint the entire background or other object. The main mistake that beginners make is that they first try to sketch the entire background, leaving white spaces in the picture where objects will be located. After that, they paint over all the objects one by one, and completely. Or vice versa, the objects are painted first, and then the background. This should not be done - the completed painting will look as if objects cut out from magazines were pasted onto the sheet. In the end, a successful composition will not work out. Any picture needs to be painted all at once, gradually. Experienced artists alternately return to one or another subject, sometimes making just a couple of strokes - and so on until the picture is completed.

Rice. 2
Stage 2
Now you can start working on the jug - you need to draw it on top of the already applied layer of paint, not forgetting about smooth transitions between shades. You can do a lot with gouache, but it is important not to overdo it so as not to create the appearance of dirt in the picture. During this work, a medium flat brush is used.
Drawing objects must be done taking into account light divisions: light, penumbra, shadow and reflex. In Fig. Figure 3 shows the diagram - it is made in the form of a grid for ease of understanding. The most difficult thing is understanding the reflex. There should be white highlights on the lightest part of the object - on a glossy surface they are more noticeable and brighter.

Rice. 3
Stage 3
After finishing the jug, the main color shades are applied to the tabletop. Do not forget that the planes of the table (vertical side and horizontal surface) should differ from each other in tone saturation. The vertical plane needs to be made darker than the horizontal plane, which is better illuminated.

Rice. 4
Stage 4
Now you can start painting the glass bottle, covering it with the same tone as the main background. It will be transparent, through it you can see the back wall, which acts as a background. For this reason, the main shade of the bottle will be the background tone. But you need to remember that the bottle still remains visible, it has size and volume. This can be conveyed in a painting by highlighting the edges of the bottle with light paint. Afterwards, a few cold tones are added to the bottle, with the help of which it will be possible to convey glass on paper. To add volume, a reflex is drawn. At the end of this work, highlights are created. There are various highlights on one bottle: some are pale and softened around the edges, others are bright and noticeable. Before you start creating highlights, it is recommended to carefully consider how they look in the author’s painting. In general, the presented drawings will help you understand how to draw a still life with gouache.

Rice. 5
Stage 5
Now it’s the turn of the pan. First, it is worth remembering the light separation grid, and for this you will have to return to Fig. 3. Not forgetting this principle, paint is applied to the pan. Dark gray and light tones are used first, and the darkest paint is left to emphasize the texture of old, chipped and worn metal.
Read more about how to convey old worn metal in a painting. To create a similar texture, you will need a coarse bristle brush, and a dry one. By this moment the gray background of the pan with chiaroscuro should be ready. A dry brush is lightly dipped in gouache; you don’t need to take a lot of paint. According to Figure 6, straight, long strokes are made from top to bottom along the darkened side of the pan. The strokes should be rough and full of holes; even during the stroke, the paint on the brush should run out. Before doing this, it is better to practice making similar strokes on a separate sheet so as not to spoil the picture.

Rice. 6
Stage 6
Now you need to finish the pan. Empty areas are covered with basic tone paint using a small brush. A reflex is drawn on the side of the pan, directly on top of the black texture. Handles are drawn and the outline of the pan is indicated. There is no need to greatly detail the subject so that individual parts of the picture do not fall out of the overall style. We must not forget about the interconnection of objects.

Rice. 7
Stage 7
Now you need to start draping around the pan, painting it completely with paint. This is best done with a large flat brush. It is important to remember that the fabric is illuminated unevenly; it appears lighter on one side. In the drawing, multidirectional planes should differ in tone from each other: the vertical plane is made darker than the horizontal. This also applies to the fabric on the table.

Rice. 8
Stage 8
It's the saucer's turn main shade his is white. Volume is given to it using bluish-gray and gray paint. Then the edge of the saucer is outlined with blue pigment - it should not be too dark. The lower part of the saucer does not need to be made too light, since it is in the shade.

Rice. 9
Stage 9
When the space of the painting is almost completely covered with paint, the drawings are detailed and refined. First, the folds in the fabric are worked out (this is easy to do even for beginners). It is recommended to use more light tones on the fabric to give the image a natural look.
The dishes on the table cast shadows. Next to each of the objects you need to draw the shadow cast from it using cool shades. Shadows should not be bright and sharp, but rather look diffused.
Stage 10
Now you can move on to the last item - the apple. It is drawn according to the principle of light separation, like other already drawn objects.
The apple casts a colored light onto nearby objects and surfaces. A pinkish tint is added to the saucer along with the shadow of the apple.
It is important to remember that through color the interaction of all objects in the picture occurs. Objects transfer part of their color to each other. By analogy with an apple, the relationships between other objects and surfaces are displayed.

Rice. 10
Stage 11
After the painting has been completed in general outline, you need to pay attention to those details that were left unattended. If the sketch made in pencil has already been erased or has become invisible under the paint, then you can draw the contours again. Then they will be painted over, because gouache is a thick and opaque paint.

Rice. 11
Stage 12
In order for the picture to acquire depth, volume and solidity, you need to use one artistic device– at the end of the work, barely noticeably blur the contours of objects in order to soften the line of contact between objects and the environment.
Master class on still life drawing for elementary school students
Tereshkova Tatyana Mikhailovna, primary teacher MBOU classes Secondary school No. 36 named after General A. M. Gorodnyansky, Smolensk.Description: This master class will be useful for teachers primary education, as well as for those who want to learn how to draw from scratch. Designed for younger children school age, aspiring artists.
Target: formation of the basics of isograms, familiarization with genre painting using the example of still life.
Tasks:
- introduce children to the features of the genre of painting - still life;
- learn to draw a still life step by step;
- form concepts such as composition, light-shadow, volume in a drawing; learn how to use them correctly in your work.
Materials:
- A4 paper, watercolor paints, watercolor pencils, a simple pencil, an eraser, a jar for water.
I. a) Guys, all of you, of course, have been to museums, art galleries, looked at the works of artists. They are all different. I think you can easily say what you can call such a picture (meaning genre) (showing landscapes), and this one? (portrait showing). Here's another job. What does it show? What should we call it (genre)? (Still life).
If you have difficulty answering or to continue the conversation, you can use A. Kushner’s poem:
If you see in the picture
River drawn
Or spruce and white frost,
Or a garden and clouds,
Or a snowy plain
Or a field and a hut,
Required picture
It's called LANDSCAPE.
If you see what's in the picture
Is one of us looking?
Or a prince in an old cloak,
Or a steeplejack in a robe,
Pilot or ballerina,
Or Kolka, your neighbor,
Required picture
It's called PORTRAIT.
If you see in the picture
Cup of coffee on the table
Or fruit drink in a large decanter,
Or a rose in crystal,
Or a bronze vase,
Or a pear, or a cake,
Or all items at once,
So this is a STILL LIFE
So, we will talk to you about still life. The poem you heard is somewhat humorous, but if you remember it, you will always know what can be depicted in a still life.
What could it be? (Children name what can be depicted in a still life).
I want to show you wonderful works by various artists (For example: P. Klas “Pipes and Brazier”, A.A. Deineka “Phloxes and Carnations”, B. Ast “Still Life with Fruit”, etc.). All of them belong to the still life genre.
P. Klas “Pipes and brazier”

B. Ast “Still life with fruit”
Why do you think? After all, the pictures are all different? Maybe there is something that unites them? (The objects and things around us are depicted).
b) But each picture has its own character, unique features. (Showing two bouquets: Y. Heisum, Zori N.).

J. Heysum

Zori N.
Let's take a closer look at our bouquets. It would seem that there is nothing simpler to draw a bouquet of flowers, but how differently the artists did it. To make it easier for you to see this, I will read two descriptions, and you will determine which one fits the first picture and which one fits the second.
- Imagine that we are no longer in the classroom. We were transported to the room where our vases of flowers stand. Cool summer morning. Freshly cut flowers, smelling of morning freshness, are lowered into the chilly water... The sun plays with disobedient rays on the flower petals...
- Twilight. An old lamp illuminates slightly drooping flower buds. The life-giving moisture is running out. But somewhere deep down life is still struggling...
Why did you distribute the descriptions this way? (Children share their thoughts and impressions).
Well done! You see how well you already understand still lifes.
V) Tell me, why did the artist need to depict in the picture ordinary items: glass, apple, some old jug?
The artist in his painting conveys not just objects, but also his feelings, the beauty of sometimes unattractive things, so that other people learn to peer at them and admire them.
II. A) We have already said that still life is a genre fine arts, and that artists working in this genre most often depict fruits, bouquets of flowers, various items etc. But such still lifes as we see now did not always exist.
Previously, still lifes were not painted at all, because... the objects of the surrounding world did not arouse much interest. However, while exploring the world, man discovered many new, mysterious, interesting things; the most ordinary things revealed their unusual sides to him.
Still life, as we see it now, did not arise immediately. At first these were only individual elements of the picture.
Still life reaches its peak in the works Dutch artists 17th century
b) The Dutch called their works “ quiet life" And indeed, this title suits these paintings very well. (P. Klas “Breakfast with fish”) or better said, life is frozen, stopped for a moment.

P. Klas “Breakfast with fish”
Take a closer look, the water in the glass, the ray of light, the aroma of lemon, the clink of overturned dishes seem to have frozen for a moment. But in a moment, the rays of light will slide along the wall again, tracing with their invisible gaze the glasses, the dishes polished to a shine, and “quiet life” will take its course.
It is interesting that the names of the still lifes are approximately the same: “Breakfast”, “Dessert”, “Fish”, etc.
There were times when still life was treated with disdain and called “dead nature.” However, the “quiet life” of things, mysterious, hidden from prying eyes, interested artists more. Artists began to paint still lifes different countries, including Russia.
V) At the beginning of the last century, still lifes were painted by I.I. Mashkov. Since childhood, he loved to draw, although to many it seemed worthless. Mashkov was engaged in drawing signs for shops and retail stores. He never studied this anywhere, and when one day an art teacher asked an already 18-year-old boy if he wanted to learn drawing, Mashkov replied: “Is this really what they teach?” After this, Mashkov decisively took the path of the future artist.
I will show you one of his still lifes “Pineapples and Bananas”.

I. Mashkov. “Pineapples and bananas”
Take a closer look, the main thing here is not a simple image of objects. Let's imagine how we would feel if these fruits were lying on the table in front of us. Let's touch the pineapple peel and feel the aroma of a freshly cut juicy piece. Let's pay attention to how the artist depicts a glass glass, a plate...
(As a result of the comparison, it can be noted that the considered still lifes, Dutch and Russian, differing in the time of painting, are easy to perceive and emotional. The artists, masters of their craft, were able to convey the beauty of the material world to the viewer).
III. So, today we got acquainted with another genre of fine art (painting). With which one? (Still life).
What new have we learned?
- How formerly artists called still life?
– Why did you start painting still life? (repeat)
– Did we like the still lifes and why?
(Still lifes provide an opportunity to plunge into history, to see how people lived in a particular country in different times. Still life tells us about the artist’s feelings, helps us see what may not be noticed in everyday life).
Briefing.
So, today we will learn to draw a still life. We need to try to complete our work by the end of the lesson. We will need albums, simple pencils, paints and watercolor pencils.

1. Let's place the sheet vertically and draw lines as I show. These lines will be very important to us. They divide the sheet into parts: top-bottom, left-right. The top is our future background, the bottom is the surface on which we will place the objects. Let's see where on the sheet we will place our objects, where we will draw them. Show this place with your palm.

2. Now we will fix the place where we will draw so that we do not lose it. Let's draw the lines easily.
But this is only an outline, and we need to draw objects.

3. Let's draw a pot. Let's show that it is voluminous.

4. Let's draw a pear in the foreground.

5. Next step. Carefully erase all the extra lines. Watercolor doesn't like an eraser. The basis of the still life is ready.

6. Stages 6 - 12 – work in color. Shade the background.

7. Apply the tone to the pot. We'll show you the most bright places- glare of light.

8. Apply the tone to the pear in the same way. We focus on the highlights.
Master class on drawing “Decorative still life” using the “decorative drawing” technique
I bring to your attention a master class on decorative drawing “Decorative Still Life”. It is designed for children in grades 3 and 4 (9-11 years old). This technique can be used both as additional creativity and during a fine arts lesson (for example, according to the “Planet of Knowledge” program in the third grade there is a topic “Decorative still life”).
Target: Arouse children's interest in decorative painting.
Tasks:
· development of children's imagination and fantasy;
· development creativity children;
· fostering interest in decorative drawing techniques.
To create a painting “Decorative Still Life” using the decorative drawing technique we will need:
· Format A-3 - 1 sheet;
· brushes (medium (approximately No. 5) and thin (No. 2));
· PVA glue;
· simple pencil;
· a jar of water;
· palette.

1. To begin with, using a simple pencil on A-3 format, draw a line for the table on which the still life will stand, and a “skeleton” for the vase. The construction of a still life should be taken very seriously, since the final result of the work will directly depend on the basis (drawing):


3. And round off the sharp corners:

4. Now we draw the ellipses. The closer the ellipse is to the horizon line, the less open it is, and the further from it, the rounder it is:

5. And we finish drawing other elements of the still life - for me these are fruits (apples and plums) and drapery in the background:

6. Now it’s better to age unnecessary lines so as not to get confused in them further (for example, these include invisible distant lines of ellipses):

7. And now we have to divide all the objects of the future decorative still life on a plane according to the following principle: light - penumbra - shadow - reflex.

8. The final touches in constructing our still life will be a sketch of the design on the fabric so that the background is not too empty (I decided to draw circles of different diameters that touch each other):

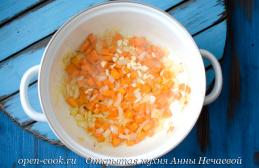
9. After the still life is built, we begin working in gouache. In my decorative still life there will be no smooth transitions of color, I will paint it along the planes into which we previously divided the objects. I decided to paint the entire work in warm colors. Let's start writing with the distant drapery. On the palette we mix shades of pink - from dark to light: