Summary: Children's drawings on the theme of space. How to draw a picture for Cosmonautics Day.
On the eve of Cosmonautics Day, it will be important to talk about children's drawings on the theme of space. In this article we want to tell you how to draw space using unconventional drawing techniques. Here we will look at drawings on the theme of space, made in the techniques of grattage, matte, and spray. You will also learn how to draw an unusual design for Cosmonautics Day using shaving foam or bubble wrap. The techniques for drawing space described in the article are easy to implement and accessible, including to children of preschool and primary school age.
1. Drawings on the theme of space using scratch paper technique
The word “grattage” comes from the French gratter - to scrape, scratch, so another name for the technique is the scratching technique.
To draw a drawing on the theme of space using the scratchboard technique, you will need:
Heavy weight white paper (or cardboard)
- colored wax crayons
- black gouache paint or ink
- dishwashing liquid
- tassel
- any sharp object (wooden skewer, toothpick, knitting needle, etc.)

Work plan:
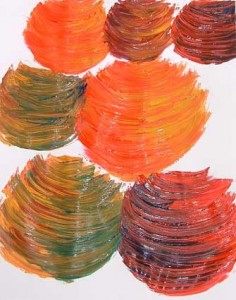
1. Color the paper with colored wax crayons in free style. Don't skimp on the crayons; they should cover the paper with a thick layer. Note: even a small child can handle this part of the job.

2. Mix 3 parts black gouache paint (ink) and 1 part dishwashing liquid. Cover the paper with the resulting mixture in an even layer.

3. Let the paint dry completely. You can speed up this process using a hairdryer. Now comes the fun part! Take any sharp object and scratch your drawing on the theme of space with it. The result will be an original work for Cosmonautics Day, made using the unconventional scratch painting technique

2. How to draw space. Drawing using the "passepartout" technique
This is a very unusual and fascinating drawing technique. First, as in the previous technique, you need to color a sheet of paper with colored wax crayons. The result is a bright, colorful rug. After this, draw templates of planets, flying saucers, space rockets, stars, etc. on cardboard. Cut out the templates. On a thick sheet of black paper, lay out the cut out templates in the form of a composition. Trace them with a pencil, then cut out the silhouettes using nail scissors. Note: This step of the job must be performed by an adult. Now place a black sheet of paper with cut out silhouettes on the “rug” painted with crayons. The drawing of space using the passe-partout technique is ready. Link to the original source.

3. Children's drawings on the theme of space. Drawing with shaving foam
For children in creativity, the process itself is more important than the result obtained. We, adults, are interested in the final product of our activities. Today we want to offer you a type of play with colors that will satisfy the needs of both children and adults. The website games-for-kids.ru describes an interesting way to create the so-called. "marble paper" using regular shaving foam and paints (or food coloring). Taking advantage detailed instructions By making “marble paper” described on this site, you can make beautiful drawings on the theme of space for Cosmonautics Day.

4. Drawings for Cosmonautics Day. Drawing space to music
In 1914-1916, the English composer Gustav Holst composed symphonic suite"Planets". The suite consists of 7 parts - according to the number of planets solar system(excluding Earth) known at the time of writing. We suggest you do the following with your child: interesting activity, dedicated to the topic space, on the eve of cosmonautics day.
Give your child a large piece of paper and paint. Ask him with a simple pencil Divide the sheet into four equal parts. Now let him listen to any 4 parts of the suite in turn (for example, Mars, Venus, Jupiter, Uranus). Listening to every part piece of music, he must depict on canvas the emotions and feelings that this music evokes in him. Children, as a rule, really like this kind of work. This is what one of our students drew.

From the resulting abstract paintings Then you can cut out the planets and stick them on a sheet of black paper. The drawing for Cosmonautics Day is ready!


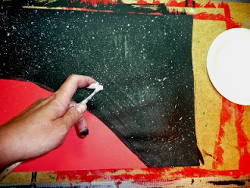
5. Drawings on the theme of space. Drawing space with a toothbrush
We invite you to make a drawing on the theme of space in the so-called. spray technique. Using a toothbrush, spray on a piece of black paper white paint. You will get a starry sky. Planets can be drawn with a sponge by smearing paint on it different colors. Look what a beautiful drawing we have made on the theme of space!


6. Children's drawings on the theme of space. Unconventional drawing techniques
If you happen to have a piece of bubble wrap lying around your house, now is the time to use it to children's creativity. After all, with the help of this wonderful material you can very simply paint the planet. You just need to apply paint to the film and attach it to the drawing in the right place.

The planet in the picture below was also made using this non-traditional drawing technique. Additional prints were made using a cardboard toilet paper roll and a plastic straw. Also, when drawing this picture on the theme of space, the so-called. spray technique.


7. Drawings of space. Drawings for Cosmonautics Day
An interesting project for children for Cosmonautics Day was prepared by the website MrBrintables.com. On this site you can download and print a drawing of the Moon. The moon comes in three sizes: large (22 sheets), medium (6 sheets) and small size (1 sheet). Print out the drawing and stick the sheets on the wall in the correct sequence.
Now invite your child to imagine who lives on the moon. Let him draw its inhabitants, their houses, transport, etc.

8. Drawings on the theme of space. Children's drawings on the theme of space
These charming aliens are drawn using such an unconventional painting technique as blowing paint through a straw (plastic tube). What is this technique?

Using a brush (or pipette), apply paint diluted with water onto a sheet of paper to create a spot of paint on the sheet. After this, we blow on the paint through a straw, it spreads in different directions and we get a weirdly shaped spot. When the paint is dry, we add all the necessary details to our alien.
Cosmonautics Day and the anniversary of the first human flight into outer space are an excellent occasion to draw a bright and colorful thematic drawing with pencils or paints together with the children. The alluring inky blue distance, fiery comets, multi-colored planets and scatterings of brilliant stars... All this can usually be depicted with a brush and watercolor. And then, decorate a school exhibition or a children's corner in the house with fantastic illustrations. Learn more about how to draw a simple or complex drawing on Cosmonautics Day for children of grades 3, 4, 5, 6, 7, see our step-by-step master classes.
A simple pencil drawing for Cosmonautics Day step by step - a master class for the little ones

The first orbital flight of a spacecraft with a man (Yuri Gagarin) on board took place half a century ago. Since then, the triumphal march of cosmonautics and aviation began, a series of successful launches of lunar rovers, satellites, rockets, stations and devices. Don’t forget to tell the little ones about this by collectively drawing a simple pencil drawing for Cosmonautics Day using our master class.
Necessary materials for creating a children's pencil drawing for Cosmonautics Day
- album sheet
- soft pencil
- eraser
- colored pencils or markers
Step-by-step instructions for the youngest children to create a drawing for Cosmonautics Day

Step-by-step drawing “Cosmonaut” for children (grades 3, 4, 5, 6, 7) for Cosmonautics Day

Celebrating Cosmonautics Day, humanity not only admires the acceleration of technological progress, but also honors the memory of everyone who has worked and is working on complex theory and “extraordinary” practice. A step-by-step drawing “Cosmonaut” for Cosmonautics Day will help children in grades 3, 4, 5, 6, 7 understand more clearly what kind of heroes they are, conquering outer space.
Necessary materials for the step-by-step drawing “Cosmonaut” for children in grades 3, 4, 5, 6, 7
- sheet of white landscape paper
- soft tip pencil
- leaf
Step-by-step instructions for creating a “Cosmonaut” drawing for children for Cosmonautics Day

Beautiful drawing for Cosmonautics Day with a brush and paints

Space has always attracted the attention of children. Its blue depth, thousands of bright lights, myriads of stars and dangerous comets with fiery tails seem to boys and girls to be something magical, fabulous, incredible. Take this opportunity to teach schoolchildren to paint space with a brush and paints for Cosmonautics Day. Surely they will like this activity.
Necessary materials for a bright drawing for Cosmonautics Day with a brush and paints
- half of whatman paper
- pencil
- eraser
- thin and thick brushes
- watercolor paints
- glass of water
- toothbrush
- gouache white
Master class on creating a beautiful drawing with paints and a brush for Cosmonautics Day

The theme of space is extremely entertaining for children. More from preschool age The guys are trying to draw bright rockets, comets, planets, etc. with a pencil and paints. Sometimes they are happy with the result, but more often they are upset by the failure. Don't be left out. Teach children (grades 3, 4, 5, 6, 7) to draw a picture for Cosmonautics Day step by step, using our step by step instructions.
Elena Shvetsova
Drawing space in non-traditional techniques . Photo report on the exhibition of children's works.
Hello, dear colleagues!
In preschool educational institutions teachers actively use unconventional drawing techniques. Term « unconventional» (from Lat. Tradition – habitual) involves the use of materials, tools, and drawing methods that are not generally accepted, traditional, or widely known.
As you know, children often copy the model offered to them. Unconventional techniques images allow you to avoid this, since the teacher, instead of a ready-made example, demonstrates only the method of action with non-traditional materials, tools.
This gives impetus to the development of imagination, creativity, the manifestation of independence, initiative, and the expression of individuality. Applying and combining different ways images in one drawing, preschoolers learn to think, decide independently what use technology so that this or that image turns out to be the most expressive.
Endless spaces space You can conveniently draw with watercolors, gouache, complementing the image spray technique.


Children of senior preschool age can draw planets with gouache paints.


Planets are easy and simple for all children in unconventional technology drawing - printing.
How extraordinary the drawings are obtained, if you take potatoes as a stamp. Even if you just cut a potato in half, dip it in gouache and create!


Whatever background the children choose, it is necessary to start applying gouache paint to the potato with white paint, even if the planet is red or green. The colors will mix during the printing process, and the planet itself will be clearly visible against a dark background outer space.
The handle of the signet should be comfortable for a child’s small hand, so it is better to insert a plastic disposable fork into the convex part of the cut potato.
And it’s even more convenient to type with carrots, because they are long, it’s convenient to keep them small child's hand. And then the diameter of the carrot changes, and you can cut several dies different sizes. So the child can easily depict distant planets and nearby ones.


As an addition, the child is invited to complete the drawing independently. spaceships flying in space and fantastic, aliens, Martians, lunatics, pilots- astronauts, stars and asteroids.


If you prepare in advance with the children soap bubble drawings(see http://www..html), you can depict the planets from these colored blanks.

Colored bubbles will help your child travel to Mars and the Moon. You need to cut out red and pink large bubbles for the planet Mars, yellow and light green ones for the planet Moon and stick them on colored paper dark shades– black, ultramarine, blue, violet. Now all that remains is to finish drawing the stars, the rocket, the alien ship, comets, and the sun. Let's start! Attention! Let's fly!
Thanks to everyone who visited my page!
"Every atom of our body
was once a star."
Vincent Freeman
A week ago on our creative Instagram @miftvorchestvo we launched a competition for the best completion of the task from the notebook “642 ideas on what to draw”. The task sounded simple - space. A lot of creative and creative works. You can see them all by tag. We publish best works and give step-by-step master class how to learn to draw space.
Best works for competition #642ideicosmos

“If you can’t fly into space, make it come to you.” Author of the photo - @al.ex_kv.


“And when darkness sleeps beside you, And the morning is far away, I wanna hold your hand and guide you...” Parov Stelar ft. Lilja Bloom - Shine. Photo by @julia_owlie.

Are they really cool? 🙂

Step-by-step master class
If you did not participate in the competition, but also want to learn how to draw space, save somewhere these step-by-step instructions on what and how to do so that it turns out bright and beautiful.
1. In order to draw the Universe, only 3-4 colors are enough. At least that's the amount you can start with. Important: The sheet for watercolors must be very dense so that it does not wrinkle from water and so that the paint spreads beautifully and evenly.

2. The outline can be drawn with a hard pencil to indicate the space that you will wet with water. Wet part of the allocated space.

3. Apply paint to the wetted area. Try to make the contours beautiful.

4. Wet the rest of the space with water and apply a different color of paint. Selectively add bright pops of color throughout the design. The drawing must be wet so that the paint flows beautifully.


5. Once the design is completely dry, apply the stars. This can be done white or yellow paint using an old toothbrush.


6. Some stars could be drawn more carefully.

Photo for the master class from the site kitty-ink.tumblr.com.
If you sprinkle salt on a wet drawing, the structure of space will turn out even more interesting. The salt will absorb some of the paint, and if you shake it off after it has completely dried, there will be beautiful white dots and clouds in place of the salt.
On our creative Instagram @miftvorchestvo we will regularly hold competitions on notebooks “642 ideas, what to draw”, “642 ideas, what to write about” and “642 ideas, what else to write about” (new!). Subscribe to keep up to date with everything creative, interesting and creatively fun.
P.S.: Did you like it? Subscribe to our new newsletter. Once every two weeks we will send 10 of the most interesting and useful materials from the MYTH blog.
Drawing on the theme “Space” is an endless field for creative experiments. When depicting the Universe “on canvas,” a small or adult artist makes individual decisions: what paper to use, what colors to choose, how to design the composition and how to complement it. Depending on the choice of materials and execution technique, the design can be more vivid or less pronounced, rich in details or laconic and abstract. Space with planets, stars and a satellite, drawn in pencil or gouache, cannot be compared with watercolor in terms of realism. A small galaxy created with a sponge and acrylic paint will become the greatest pride of a novice artist or talented child. And if you have never had to do this kind of creativity before, don’t be upset. We will tell and show how to draw space in step-by-step master classes with photos and videos.
Drawings with colored pencils or paints on the theme “Space” - step-by-step master class for children

Children's drawings with paints or pencils on the theme “Space” are an excellent way of self-realization for the little ones. By depicting the cosmic abyss, colorful planets and fiery comets, children show their imagination, discover new talents, and show their individuality. And if in a master class on creating illustrations several different techniques, the process immediately becomes many times more interesting, entertaining and educational.
Necessary materials for children’s drawing with pencil and paints on the theme “Space”
- thick white paper
- black Whatman paper
- compass (or round objects of different diameters - lids, saucers, glasses)
- pencil
- gouache paints (including white)
- brushes of different thicknesses
- stationery scissors
- PVA glue
A step-by-step master class for children on creating a bright drawing on the theme “Space”
- Place a thick white sheet on the work surface. Using round objects of different diameters and an ordinary pencil, draw nine circles on paper.

- Depending on the diameter, the circle will be one or another planet. For example, the largest figure is Jupiter, and the smallest is Mercury.

- Using gouache paints, apply characteristic colors to the circles. You can look at the real colors of the planets in a children's encyclopedia, or you can create unusual fantasy planets to suit your taste.

- When the paint is completely dry, cut out the resulting shapes using sharp scissors along the contour.

- On a black piece of paper (you can use half) leave splashes of white gouache paint. To do this, take a little gouache on your brush and wave it over the paper several times.

- Plan the location of your planets "in space". Place them carefully on whatman paper and take a closer look. If you like the composition, proceed to the next stage.

- Using office glue or PVA, secure all the elements in place.

- Press each planet firmly with the palm of your hand or a thick textbook to ensure the pieces stick firmly. Do not overdo it with glue so that excess mass does not leak out to the sides. On a black background, the spots will be especially noticeable.

- After the glue has completely dried, remove the textbook and evaluate the result. Drawing with colored pencils or paints on the theme “Space” according to the step-by-step master class for children is completely ready! Photo 11
How to paint space with watercolors - an unusual idea for beginners

Using watercolor paints to create a “Space” drawing is much simpler than it seems at first glance. On a wet basis, the colors independently mix into bizarre galactic patterns, realistically displaying wondrous nebula and fine stardust. Even a child can cope with such a simple technique fine arts. And for adults, we offer a more complicated option for beginning artists - an unusual idea to paint space with watercolors in a geometric shape.
Necessary materials for painting “Space” in watercolor for beginners
- sheet of thick white paper
- water and brushes of different sizes
- watercolor paints
- acrylic paints (black and white)
- table salt
- ruler
- protractor
- sharpened pencil
- masking fluid for watercolors (Art Masking fluid)

How to paint space in watercolor in an unusual way - step-by-step instructions
- Take the “pacific” as the basis for the image - a sign of peace and love. Using a template from the Internet, transfer the outline onto thick white paper. You can also draw the drawing yourself using a ruler and compass.

- To prevent watercolor stains from getting into restricted areas, use a special masking agent. At the last stage of preparing the drawing, it is easy to remove it from the white area.

- Fill in the sign with watercolor masking without going beyond the outline. Wait until completely dry.

- Thoroughly wet the areas between the axes of the sign with clean water. This way the paint will form more realistic “cosmic” stains.

- Apply a drop of blue watercolor to one of the wet areas. Don't make too harsh strokes; let the paint spread on its own.

- Add black watercolor or ink to the blue tones to create a natural galaxy effect.

- Thus, fill all the free areas with colorful stains. When the watercolor has dried a little, add a yellow glow and purple reflections.

- Don't be afraid to protrude into the white areas of the sign. When you're done, you can clean them.

- More wet picture sprinkle with coarse salt. Sprinkle the resulting space with small specks of white acrylic paint.

- When the image is completely dry, sketch out the outlines of the marvelous space town with a pencil. Using a thin brush and white paint, draw all the lines.

- As a final step, remove the thin film of watercolor masking from the white areas of the sign. The contours will become smooth and clear, and the fields will become snow-white.

- Now you know how to paint space with watercolors - unusual idea for beginners will allow you to create with your own hands beautiful panel for home or bright postcard for a dear person. Photo 25
How to draw the perfect cosmos with stars, satellites and planets with a sponge on home ceramics

Most often they draw space watercolor paints- fast, convenient, practical. But what if you want to cover a household item that is completely unsuitable for watercolor with a fashionable galactic image? After all, ceramics, wood and other popular materials absorb watery paint, leaving only faded shades on the surface. In this case, it is better to use pigment ink or acrylic paints in combination with a soft sponge or foam sponge. This way the image will be successfully fixed and will retain its brightness and clarity for a long time.
To learn how to quickly draw space with planets and stars with a sponge and acrylic paint on ceramics, see our next master class with photos.
Necessary materials for the drawing “Space with stars and planets” on home ceramics
- old plain ceramic dishes
- acrylic paints
- spray with water
- sponges or sponges of different sizes
- synthetic brush
- matte varnish

How to paint space with stars on ceramics with a sponge and acrylic paints

Another interesting and original option on how to paint space with paints

Watercolor images of space are good in themselves. They seem to be imbued with a special atmosphere of depth and mystery. But even such seemingly extraordinary drawings can be made even more entertaining. For example, combining a space background with a city panorama. You will learn how to paint space with paints for such an original and unusual option in our next step-by-step master class.
Necessary materials for the original painting “Space” with paints
- thick landscape paper or watercolor paper
- watercolor paints
- masking fluid for watercolors
- white acrylic paint
- medical alcohol
- table salt
- pencil and ruler
- brushes of different thicknesses
- artistic adhesive tape
- black gel pen

How to paint space in an interesting and original way - step-by-step instructions
- Swipe with pencil horizontal line in the lower half of the sheet. This way you will limit the drawing area. From the line up, draw several slender houses by hand. Don't worry about their symmetry. The more chaotic the buildings, the more original the drawing will look.

- Apply artistic tape underneath the line. It will serve as a limiter for paints.

- Paint over the houses with white watercolor masking. Wait for the liquid to dry.

- Moisten empty spaces on the sheet with clean water. Spread on a wet surface of paper various shades blue: from deep inky to sky blue.

- Add to different tones of blue watercolor additional colors- lilac, pink, green, etc. The galaxy should turn out bright and more or less natural.

- Sprinkle the wet pattern with table salt. As soon as the “space” dries, shake off the grains.

- Using white acrylic paint and an art brush (you can use a toothbrush), leave small white drops - stars - on the drawing.

- Place drops of alcohol in several places. The substance will slightly blur the paint and give the image a more complete look.

- Use an eraser to lift the masking layer and remove the thin film. Now the places for houses are in perfect order.

- Using a black pen, draw windows and doors on the houses. Remove the art tape.

- This interesting and original version of how to paint space with paints will appeal not only to children. Even adults will enjoy spending time with such an exciting creative process.

How to quickly draw and successfully use the “Space” drawing in gouache

To beautifully draw space with gouache and use it in an original way in your home interior or as a souvenir, you need to make a blank yourself. To do this you will need thick paper and an ordinary wooden hoop. By carefully pressing a damp white sheet between the circles of the hoop, and then drying it with hairdryers, you will create an ideal field for “cosmic” creativity.
Necessary materials for drawing “Space” with gouache paints
- blank - hoop with paper
- gouache paints
- white cardboard cutouts (feather, polar bear, diamond, etc.)
- good photo
- white acrylic paint
- tinted or printed paper

Master class on the creation and original use of gouache drawing “Space”

By viewing our step-by-step master classes with photos and videos, you learned how to draw space with a pencil, gouache, watercolor or sponge with acrylic paints. Spend a little more time on the process, and your drawing on the theme “Space” with planets, stars and a satellite will be ideal not only for children, but also for novice artists.